Showing posts with label Archival Ink. Show all posts

Friday, 4 June 2021

Studio Light Art Journal with Belinda Spencer

 Hello Scrapping Clearly fans!!

It's Belinda here today to share some art journal pages in the fabulous Studio Light Art Journal.


This is the art journal. I love that it is a ring binder so the pages can easily be removed to work on. The pages are 6.25" x 6.25" and are constructed of really sturdy good quality watercolour paper. There is a zip lock plastic pocket in the journal too to keep a few supplies handy if you are out and about sketching. I am super impressed with this journal and think I will need more than one!!


I decided to have a play with some collage to start with. I tore up some sheets from the Art By Marlene Collage Paper as well as random bits of notepaper, book paper and the punched edges of some notepaper. There's a bit of Heidi Swapp tape in there too. I used Dina Wakley Soft Matte Gel Medium to add the collage and then set it aside to dry completely. The pages warped a little but that will eventually sort itself out as the journal fills up and is kept closed. A little warping never hurt anyone!


Next I added some stencilling with the latest Art By Marlene Stencils and black gesso. I added some stamping too using the Mandala Tapestry Stamps by Art By Marlene and Jet Black Archival Ink.


I toned everything down a little by brayering over some heavy white gesso.


Next I grabbed a bunch of Dylusions Paints and played around with those. I swiped the paint over parts of the pages, placed a stencil over the top and then wiped away the paint with a water wet wipe. My wet wipes were a bit too juicy and smudged the stencils in places so I had to blot away with paper towel before removing the stencils.


Once the pages were dry, I went to town adding Art By Marlene Die Cut Elements, more stencilling, stamping and doodling with Posca Pens. I threw a lot at these pages and they held up really well. They turned out a lot busier than I had planned but I like the craziness of them.


Thanks so much for stopping by the blog today. I hope you find some time to play with your Scrapping Clearly stash.

Cheers
Belinda

Saturday, 8 August 2020

Buckle Up Buttercup

Welcome to another fantastic weekend of creativity. I hope you are enjoying creating with the August moodboard. A couple of weekends ago I created a layout using a car like the one in moodboard and have found another photo similar to create with. I take a lot of similar photos at different angles when the kids were little - they each have a different story. In this one my little boy was so proud that he got to drive the car at Dreamworld. If we could only keep them this young and cute.


For this layout I chose some 12x12 Vicki Boutin paper from the Let'sWander range - Beach Vibe & Chasing Stars. I used the Chasing stars paper as the base and used a strip of the Beach Vibe as a layer.

I have added a little of the Ranger Distress Ink - speckled egg to the background. I did this by adding it to plastic & spraying a little water before tipping it and dabbing it on the cardstock in a few places.


After the ink had dried I then stamped in a few places the Stampers Anonymous stamp - Grunged  . I used Liquitex Modelling paste with a Dina Wakley stencil - Wheels. Once all of this was dry I marked out with a pencil where my photo and layering cardstock would go and then took them away and used my sewing machine to add some black borders.


As I added all the layers I found some grey loose cardstock on my desk to add under the photo also. I built up the photo using foam tape. I have then stamped a few small dots using Ranger Ink and a Viva Las Vegas stamp. The title was created in the Silhouette and coloured using an Artline black marker and raised on the layout using foam tape. I have used some yellow stickers and stars from the Heidi Swapp Stationary set and used a good amount of the Studio Calico timber embellishments that came in the pack. To add to the boy theme I added some chipboard cogs coloured with Staz On - midnight. I finished off the layout by adding a flair & some older rub-ons I had in my stash and Vicki Boutin heart stickers - because they are super cute. 


I hope you are having fun creating with this months Moodboard and I am enjoying the entries trickle in and fill up the Share & Inspire Facebook page album. We are a creative bunch.


Until next time - stay safe, create & have fun

tracey xx


Thursday, 5 April 2018

A Couple of Multi Photo Layouts by Peg

Hello Arty Peeps.

Life has been so full at my place lately that there has been precious little time or motivation for scrapping. Unfortunately, that doesn't stop the need to get stories in albums, but it does make the process so much more difficult, don't you think?

In an effort to simplify the job I decided to pull out a few things that were the last of a range. I always feel better when I can finish a paper range I have or a pack of something. The sense of completion combined with the anticipation of using something new is a heady mix.

This time it was the fabulous Teresa Collins Something Wonderful range.
I have loved this range so much for its versatility, it is so easy to use for simple pages that look more complex.


I used this paper for my base, this paper for my cards, and matching washi tape to add some energy to my page.
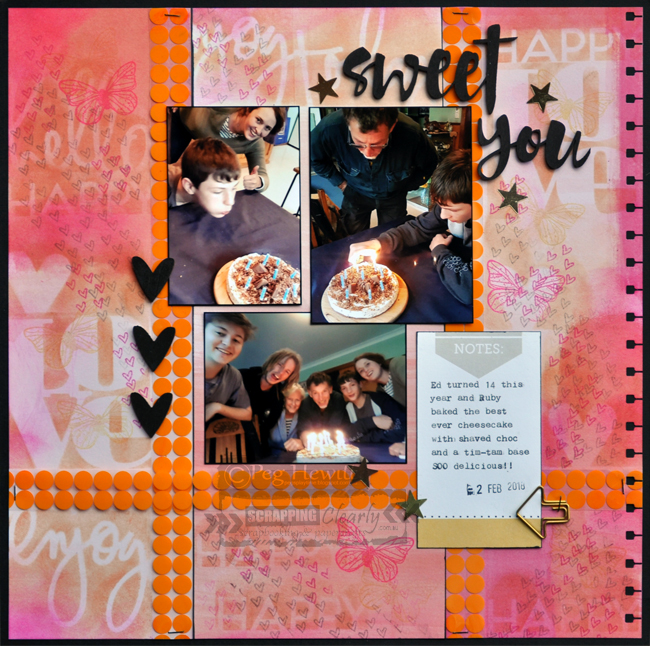
I also had some of the Pink Paislee Fancy Free range left over so I used this paper, added a punched border and some black cardstock, to mat my photos.
My title was done with a Pink Paislee acetate alpha, I added a few enamel shapes (hearts), and stapled things on with my Tim Holtz tiny attacher.

I also used this paper from the Pink Paislee Fancy Free range to start this page.
The other half of this paper became a strip down the middle which I edged using some Hambly transparency, stapled on with my Tim Holtz tiny attacher again.


I was at a loss with how to finish it after adding my typed and dated journal spot so, deciding that it needed more interest in the background, I reached for my Ranger Archival ink pads and some little Heidi Swapp stencils. I added some stamping too with these adorable stamps, and some wood veneer coloured black, both from Cocoa Vanilla Studios. Some star sequins and a cute paper clip finished it off.

This page started to take shape once I'd punched out the edge and mounted it with a black border. I could see exactly what was needed once it was 'framed'. Does this ever happen to you? You're stumped until it's framed?
As a side note, I always save the middle out of the black cardstock backing,
it's handy for matting photos, which I almost always do.

Thanks for coming by,
I'd love to hear your thoughts in the comments.
Til next time,
stay arty,


Wednesday, 28 March 2018

Olde Worlde art journal with Em.

Hello hello! 
I hope the month of March has been awesome for you.

So who else is in awe of all the awesome Journal art Lisa, Peg, and Kylie  have been creating? 
Oh my they are such great inspiration, so much so that I had a play in my journal too. 
I have also been playing and teaching myself a little abstract acrylic art. So I tackled it again in my journal. 
With Lisa in my head and the desire to create I made this.....


I think I’ve said it before, but the freedom in art journalling is relaxing and exciting.
You never quite know how it’s going to turn out. 

Once I had layered my base paints which included Dylusions white acrylic and Art Anthology Metal Effects silver, I splashed Liquitex Carbon Black acrylic ink around and at the time thought I had ruined it a little by being to heavy handed with it. 
But this is what is so great about art journalling, you can just keep building. So I splashed Liquitex Titanium White acrylic ink as well then added some Dylusions Squeezed Orange and Ranger Distress Collage Medium into the mix, this ‘softened’ the black splashes a little. 


Next came the stencilling and stamping. 
I used an archival ink through a few different stencils and on various stamps


Once all my ‘messy creative’ was complete, I added to the page with a couple of We R Memory Keepers chipboard frames and, sitting in and around these, I used Tim Holtz paper dolls to add a bit of curiosity to the pages. 


I added to the page a few older stickers I’ve had for years and finished with some more stamping on the frames, and Liquitex splats around it all to pull it together. 


When I started these pages I thought I had totally wrecked it, but the end result makes my heart smile. 

If you have yet to try this form of creativity I highly recommend it. It allows the inner creative out. You might be pleasantly surprised. I know I am. 

I hope I can also inspire you a little with my process video. 


Till I see you all in April....happy scrapping. 

Em. Xx


Saturday, 24 March 2018

Cathartic Art Journalling

G'Day Arty Peeps.

I hope you are making time for creativity in your days.
Along with Kylie and Lisa, I have been spending a short time each day playing in my art journal, for sanity's sake.
It is a bit like meditation but with eyes open and hands busy. An opportunity for me to pour out
the emotions in my head onto a surface.

This first page was started with Dylusions paints and a Crafter's Workshop stencil, dried and overlaid in some places with washi tapes - striped and newsprint.
It became one of those pages that just keeps growing, layer upon layer because you're not really happy with it and don't have any idea where you're going with it.
So, I decided to try to paint a simple black and white image on top, a profile of a woman's face leaning her forehead on her hand. Unable to get it to look how I liked, I covered it too with paints and stencils,
a little more transparently this time.

Then I had a lightbulb moment and reached for my Lion head stencil, made with my Silhouhette,
and some white Dylusions ink spray. I scribbled over the stencil outline with a black pen.
It was only left to stamp on the page what was going through my head.
These alpha stamps are an old Hero Arts set (I think) but you can find more current sets here.
I used Archival ink for the stamping and a bit over and around the page.


After the first, kind of emotional, page I felt free enough in my head to play without my inner critic going off. I grabbed whatever was close, starting with black gesso, and a magazine face applied with Matte Medium.

Looking through my stash of collage materials I came across some ancient sticky felt ribbon (omg, remember these?!) and these fantastic pages pinched from my mate Lisa's awesome murder book (Thank you Lisa, eternally grateful xx). The title worked for me, but I also wanted to include the story, well, because it's dark, creepy, and entertaining.

So, adding the felt to the right side, I balanced it with some starburst stencilling.
I smothered the lady's head in Dylusions paints, it was supposed to look like flowers but I gave up on that idea, and stuck down my gruesome story, again using Matte Medium.

To brighten the page I added pink paint. Then lastly, swiped the edges and across some bits of the page with black Archival ink and added black drips.

This page was quick, messy, and fun. Just the way I like it.


I recommend you get yourself an art journal if you don't already have one, they really are cathartic, and a great place to explore with different mediums and practise your techniques.

Remember you still have a week to join in our challenge this month,
we love seeing your projects, and you could win $30 to spend in the shop.
Jason took this video of the amazing shop, check it out!!


Thanks for coming by,
til next time,

Thursday, 22 February 2018

Why I Art Journal, and a few pages

G'Day Arty Peeps.

This week has been cooler at home, with yellow leaves underfoot,
a delicious hint of Autumn in the air, and a sense of more creative time to come.
I'm looking forward to more indoor play time, how about you?

With my kids growing up and fewer photos to scrapbook I find myself turning to art journals for creative release. They are a place for me to practice with products to see what I like, but also somewhere to explore my thoughts.
Some pages are deeply personal and never shared, others more playful,
still more others meaningful in emotional ways.
I find art journalling cathartic.

So, today I'm sharing just a few of my pages,
I have listed products under each image, in order of use.

Playing with products, seeing what I can layer onto what without making a big mess.


Archival and Stazon inkpads - Cherry Pink, Sunflower Yellow, orange, black
Fude Ball black pen

A cathartic piece, scribbling 'train of thought' journalling.


Vintage magazine images & paper napkin applied with gel medium
Fude Ball black pen
White Sharpie marker

Inspired by a challenge - yellow, navy blue, and a secret.


Prima Bloom stamp (on special)
Flower cutouts made with a freebie and my Silhouette

I really like the freedom I have in my journals.
No rules, no striving for perfection.
It's a whole new world for me, and a great tangent for my creativity
as I'm finding less and less to put in my scrapbooks.

Thanks so much for dropping by today,
'til next time,


Thursday, 4 January 2018

Fort Fun Together - A Boy Page by Melinda

Hi there and welcome to the ScrappingClearly blog today!!

Melinda here with you and I am sharing my first make, not only for the month, but for the year.
I hope the New Year finds you well and ready for lots of scrappy inspiration from all of us here!!

Kylie sent me the very awesome Pink Fresh Studio Boy's Fort collection and I couldn't wait to get stuck into it!!
Here is my first page with this awesome collection, I am beyond happy with how it all came together!


There is also a process video available here if you'd like to see how this page came together for me!

To create my background I started with Marshmallow cardstock paired with 3 different
Distress Oxide Inks - Salty Ocean, Peacock Feathers and Faded Jeans - and the packaging technique;
adding extra water when needed and drying off between coats. 
I love how the colours sit on top of each other without changing the colours
- you can really see that in this close up of some splatters!


I added some stamping using black archival ink and a couple of texture stamps randomly across my mixed media.

I used papers "Wowsers", "Bold" and "Game On" to layer messily behind my photo
adding extra dimension between my photo and the papers with tags.


Time to work on the title!
The name of the collection reminded me of the photo I chose,
which in turn helped me pick a title.
I have built my title with the Boys Fort Mini Alpha Stickers and also some alphas from
the Teresa Collins Signature Series which I have used some Fossilized Amber to colour
- this colour is a great match with those mustard-y yellows in the collection!
I left just enough room for a little journalling under the title!


With the main part of my layout done I pulled out some embellishments
and used some of the Printed Veneer Stickers (these are AWESOME!),
ephemera pieces, and also some of the Phrase Stickers, to embellish.


My very final touch were some black splatters using my Roadbase Colour Spray by Colour Blast
and some black marker, outlining the big alphas in the word fort.
With some of the shadows in the photo, plus the journalling and the black phrase stickers,
I felt it was just what I needed to finish the page off.

That's it for me for today but I will be back again
sharing more "Boys Fort" inspiration!!

I hope the start of your 2018 has been fab,
I can't wait for some more play time!!

Happy scrapping!


Monday, 11 December 2017

Layering Without Bulk.

Good Morning Arty peeps!
Peg here again, with a more complex page today.
Lots of layering but very little bulk, easy to fit in an album.


My eldest boy is a hippy child, he loves bright colours, music, and the bush,
so I made a multi-coloured page to reflect his passions.
On a background of heavyweight card, I began by flicking various colours of Distress Oxide inks, drying between colours. Then I used a foam applicator to add archival inks through stencils.

I framed the feature photo with a gorgeous


My title is an acetate word from Heidi Swapp, and chipboard alpha stickers
from Teresa Collins' Something Wonderful range,
and some Dymo which I also used for journalling.


Here you can see the Distress Oxides a bit better. I have also stamped with
some heart shaped bubble wrap.

Thanks for dropping by today.
I hope you are playing along with us for a chance to win
the WeRMK sewing machine that Kylie is so generously offering.

upload your entry here by Sunday midnight.

'Til next time,
stay arty,