Saturday 28 November 2020

Everyday Moments by Tracey Thorne

 Welcome to another Saturday. I am using up a bit of those stockpiled pre-inked pages again - this one has been coloured with Ranger Speckled Egg ink. I've then used the AALL & Create stencil #104 and a little Liquitex Matte medium gel. After this dried I ran it through the Heidi Swapp Minc using Orange reactive foil. I love how it has only picked up the colour in a few textured places but defined the shape perfectly.


I backed my photo using Pink Paislee printed cardstock - Riverside Lane before working out placement and stitching a black border around the photo and the entire layout. I have then added some stamping using Lavinia stamps Fairy Barnacle and Stampers Anonymous Documented. Using Izinks flamingo I coloured the Fairy Barnacle to help define the stamp and lift the black mess I had created.


I layered some feather napkins along the bottom edge of the stamps before adhering the photo to the page and then layering the outer elements. I have used a chipboard title -everyday and accompanied it with the 2Crafty chipboard lightbulb - moments. These were coloured black using an Artline marker. I have added some pre stamped lotus cluster flowers from the AALL & Create stamps #441 and coloured them using watered down Izinks and Distress Inks.


A little added black cotton under a few elements and a typed Yoga quote was added. I have used a fontworks stamp from my stash on the bottom of the page and a Lotus silhouette I created at the top of the page.


Thanks for popping and have a fabulously creative weekend

Tracey


Thursday 26 November 2020

Artsy Arabia Christmas Cards - With Karyn Schultz!

  Hi Scrapping Clearly Lovelies!

It's Karyn here and today I have a set of 3 Christmas cards that I created using the Art-By-Marlene Artsy Arabia collection available at Scrapping Clearly
 
 
 I started by creating card bases using heavy weight white cardstock (10.5cm x 14.8cm). I cut the Artsy Arabia SCRAPBM01 paper to size 10cm x 14.3cm as a mat for the card base. I also cut more white down to 9cm x 13.3 cm to use as a background for my cards.


   I added paint to the backgrounds using Art-By-Marlene Bold and Bright watercolor paints - to give a watercolour wash effect. 
 
  
 I selected a number of the lantern elements from from the Artsy Arabia Die-Cut book - I thought these looked like Christmas ornaments.


Here is the first of my completed cards - I love the fun and quirky vibe with the Artsy Arabia collection. 
 
 
 The other 2 cards are created in a similar manner - just add a stamped Christmas sentiment to finish.


 Thanks so much for stopping by!
 
Crafty Hugs xx


Wednesday 25 November 2020

Capture, by Amanda Hartmann

 Hi all,

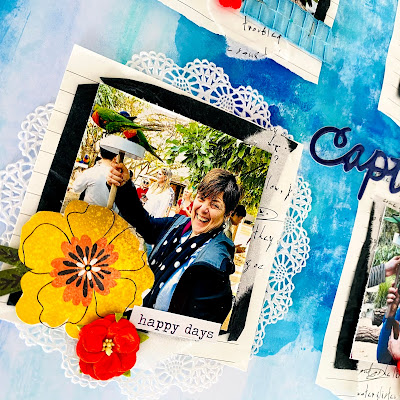
Today I share this fun and bright, multi-photo layout! I love using a grid design like this to get more photos on the page!

I created my own background and layered little stacks for each square of the grid


The background was created with Dina Wakley Acrylic paints. I used the colours: Sky and Lapis.

I used a brayer to apply the paint to the centre and edges of the smooth white cardstock. I mixed some water to the paints and lightly spread the colours to edges of the page.


For each square, I layered note paper, black tissue paper, a doiley and some Scrap FX tissue paper.

To finish, I fussy cut some flowers from the Vicki Boutin Sunshine and Smiles paper and layered these with some flowers, stickers and buttons.

And an American Crafts Thicker sticker title is always a winner!


Thanks for looking today!
Amanda


Tuesday 24 November 2020

He's got skills by Tracey B

 Happy Tuesday everyone! 

Here's another bright and cheery layout inspired by this month's mood board.


I wasn't sure exactly where I was going with this LO in the beginning (situation normal really) so I started with a coat of white gesso as I was pretty sure I wanted to be able to 'move' whatever medium I decided to use.

I opted for some gelatos initially so a scribble on my messy mat, a spritz with water and then transferred them to my layout using some plastic packaging.


I also used them to colour the diecuts I was using (just painting with a brush).   
I used a swirly stencil and a pencil to draw in some curves and then went back in with a black Posca pen & defined the swirls adding a few more freehand as I went along.   Note to self - ensure your LO is dry or you'll bugger up your Posca!


I then grabbed another stencil, a foam applicator and some Distress Oxide for another layer. 

Because the Distress Oxide will react with water I spritzed some ware onto by hand and then flicked it onto the LO.

Another stencil and some Art Anthology Dimensional Velvet paint. I just love this stuff - so lush and creamy.


I then fussy cut a Hambly screen print, layered my photo, added a title and stuck everything down and lastly added some journalling.


Products I've used include

Gelato (lemon, tangerine and bubblegum)
Distress Oxide (Picked Raspberry)
Foam applicator
Mosiac tile stencil
Diecut (borrowed)

Still a week left to join in the fun with this month's mood board.


Would love to see what you create.

cheers
Tracey


Saturday 21 November 2020

Ordinary Everyday Life by Tracey Thorne

 I have dusted off my old pots of Dylusion paints and I have to say some are in a sorry state - all dried up. A paint brush still picked up the pigment and I also used a spatula to apply the yellow as its consistency was very much like heavy bodied modelling paste that was a little too dried up but alas it still worked and added a nice vibrant hit of colour to this layout.


I added the yellow first with a spatula. Once dry I added the AALL & Create stencil #64 and with a paint brush picked up the paint/pigment and dry brushed through the stencil. 


I chose some Vicki Boutin papers from the Kaleidoscope range  to layer on the page. I have cut these at varying sizes and positioned them so that I could draw a rectangle to add some stitching. 


I removed all the layers and stitched a black straight line border on the page before adding the paper layers back on the page.


Now for the stamping. I have used the Dylusions Creative Dyary stamps on the page. I chose the rectangular one and worked it around the page as a very funky border.  I have used the Cocoa Vanilla Legendary washi tape to tie in a little more bold colour from the photo to the printed paper and topped this off with a cut file frame that I have designed. 


I finished the page off with a little typed journalling and stapled the title on from the Vicki Boutin printed paper.


I hope you have a fabulous weekend full of creative joy. Don't forget our brights moodboard for inspiration and load your creation on to the Facebook page for a chance to win a store voucher.


Friday 20 November 2020

Celebrate - with Belinda Spencer

 Hello Scrapping Clearly fans!!

It's Belinda here today to share my latest project for Scrapping Clearly featuring lots of awesome products from the store. Today I have a layout to share with you inspired by the gorgeous November Mood Board.

'Celebrate'


Here's a reminder of the stunning colours of the mood board:


This was such a fun layout to create starting with an explosion of colour on my background using the awesome Distress Oxides from Tim Holtz. I love the Oxides so much that I try to use them on everything!!


Here I pressed the ink pads onto a piece of plastic as some of the other DT have done (I had to try it for myself!!) I spritzed it with water and then pressed onto the page lightly. I dried the page in between each colour. I also picked up some of the colour from the plastic with a soft wet paintbrush and flicked it over the background.


Next I added a layer of stamping using the same colour Distress Oxides and the stunning Mandala Tapestry stamps by Art By Marlene as well as Vicki Boutin Kaleidoscope Clear Stamps.


I also used the sentiment stamps from the Vicki Boutin set with the Distress Oxides and stamped them around the central area.


Next I added some Heidi Swapp patterned papers that I had die cut using the Kaisercraft Nesting Pennants Dies and some Heidi Swapp Ephemera on top of some messy cotton thread..


Finally I added my photo as well as the title and other embellishments.


Here's what I used:
- Favourite Things Stickers
KAISERCRAFT Decorative Dies Nesting Pennants
BAZZILL Marshmallow Heavy Weight Cardstock
- Peacock Feathers
- Picked Raspberry
- Spiced Marmalade
- Twisted Citron
- Wilted Violet
ART BY MARLENE Clear Stamps Mandala Tapestry
VICKI BOUTIN Clear Stamps Kaleidoscope

Thanks for stopping by the blog today. I hope you find some time to have a play with the mood board too.

Cheers
Belinda