Showing posts with label something wonderful. Show all posts

Thursday, 5 April 2018

A Couple of Multi Photo Layouts by Peg

Hello Arty Peeps.

Life has been so full at my place lately that there has been precious little time or motivation for scrapping. Unfortunately, that doesn't stop the need to get stories in albums, but it does make the process so much more difficult, don't you think?

In an effort to simplify the job I decided to pull out a few things that were the last of a range. I always feel better when I can finish a paper range I have or a pack of something. The sense of completion combined with the anticipation of using something new is a heady mix.

This time it was the fabulous Teresa Collins Something Wonderful range.
I have loved this range so much for its versatility, it is so easy to use for simple pages that look more complex.


I used this paper for my base, this paper for my cards, and matching washi tape to add some energy to my page.
I also had some of the Pink Paislee Fancy Free range left over so I used this paper, added a punched border and some black cardstock, to mat my photos.
My title was done with a Pink Paislee acetate alpha, I added a few enamel shapes (hearts), and stapled things on with my Tim Holtz tiny attacher.

I also used this paper from the Pink Paislee Fancy Free range to start this page.
The other half of this paper became a strip down the middle which I edged using some Hambly transparency, stapled on with my Tim Holtz tiny attacher again.
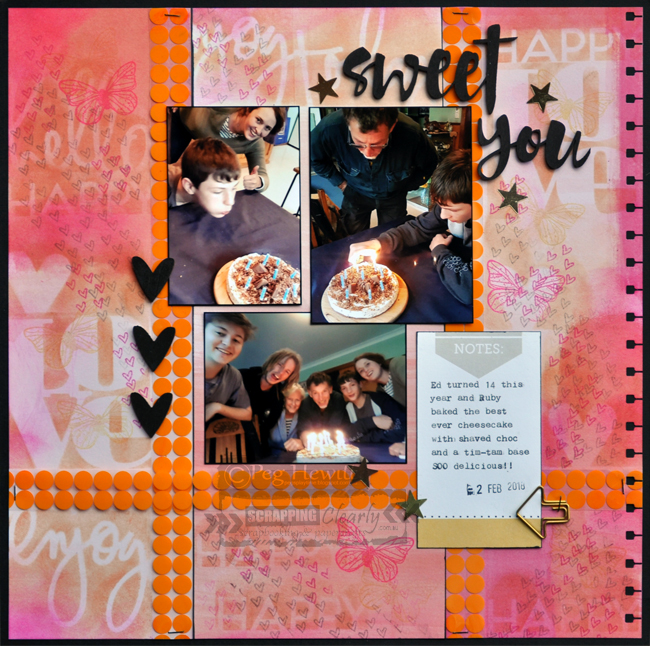

I was at a loss with how to finish it after adding my typed and dated journal spot so, deciding that it needed more interest in the background, I reached for my Ranger Archival ink pads and some little Heidi Swapp stencils. I added some stamping too with these adorable stamps, and some wood veneer coloured black, both from Cocoa Vanilla Studios. Some star sequins and a cute paper clip finished it off.

This page started to take shape once I'd punched out the edge and mounted it with a black border. I could see exactly what was needed once it was 'framed'. Does this ever happen to you? You're stumped until it's framed?
As a side note, I always save the middle out of the black cardstock backing,
it's handy for matting photos, which I almost always do.

Thanks for coming by,
I'd love to hear your thoughts in the comments.
Til next time,
stay arty,


Thursday, 15 February 2018

Catching Up on 2017 Project Life ~ Week 12 with Melinda

Welcome to the ScrappingClearly blog!!
Today I am sharing a 2017 Project Life spread for which I have done a bit of a "ScrappingClearly Stash Dive" to find supplies.

The Project Life style of memory keeping, with pocket pages, is quick and allows lots of space for story-telling if that appeals to you.
I love the variety of page sizes and pocket orientation available too
it just makes it so easy, which is great if you have a busy life!

I've started with the following goodies and I will link to the store both here and where they appear throughout my blog post. I also have a process video up HERE on the ScrappingClearly YT channel which I would love for you to check out!!

Pink Fresh Studio - Boys Fort - "Bold" 12 x 12 paper
Pink Fresh Studio - Boys Fort - "High Five" 12 x 12 paper
Pink Fresh Studio - Boys Fort - "Wowzers" 12 x 12 paper
Pink Fresh Studio - Boys Fort - "You Rule" 12 x 12 paper
Pink Fresh Studio - Boys Fort - Mini Alpha Stickers
Pink Fresh Studio - Boys Fort - Cardstock Sticker Phrases
Pink Fresh Studio - Boys Fort - Ephemera
Pink Fresh Studio - Boys Fort - Printed Veneer Stickers
Teresa Collins - Something Wonderful - Washi Tape
Teresa Collins - Something Wonderful - Ephemera Tags
Teresa Collins - Something Wonderful - Photo Overlays
Heidi Swapp - Wood Veneer
Studio Calico - Brighton Pier - Wood Veneer
White Gesso
Distress Oxide Ink - Faded Jeans

And here are my pages, first up is the left hand side


On this side I have used the "Wowzers", "High Five" and "You Rule" papers from Pink Fresh Studio as my cards. I've also used some of the Mini Alpha Stickers, ephemera pieces and also the Sticker Phrases from the same collection. A little washi and some veneer pieces from this pack by Heidi Swapp and this pack by Studio Calico. Some journalling and date stamps and the left hand side is done.

Here are a few close ups of this side


And here is the right hand side


On this side I have used 3 of the ephemera tags by Teresa Collins for the cards and cut a piece of the "Bold" patterned paper to 3x4 for my title card. I didn't feel like I needed heaps of extras on this side but I have used the photo overlay on the bottom left hand photo, a couple of ephemera pieces and one of the printed veneer stickers. The bottom right photo is a flip pocket and on the inside I have a piece of the "Wowzers" patterned paper for my card and also one of the Studio Calico wood veneer pieces.

On my title card I have used another of the Heidi Swapp veneer pieces, covered it with 3 coats of white gesso and used a stamp from my stash with Faded Jeans Distress Oxide Ink. Some washi, mini alpha stickers and a couple of the ephemera pieces and this page is all done too!


Here are a couple of close ups including one of the flip pocket opened


It feels so good going back and getting these pages done!
Slow and steady and in the album is way more important than "perfect" to me
and I am happy in that place right now!

I had lots of fun mixing and matching all of these different pieces together and really like the way it all came together in the end. I hope I inspire you to get some more stories documented and until next time, happy scrapping.

Melinda

Saturday, 23 December 2017

How Do You Purge and Organise your Art Supplies?

G'Day Arty Peeps!

Hope you have your holiday season under control
and are finding some time to be creative.

Things are pretty relaxed at my place so I'm hoping to find
time to purge and sort my art space, I'm gonna need a fair bit of it!
After 17 years of scrapping and heaven knows how many boxes of product,
my art room needs an intensive overhaul. Maybe I can even rope in the kids to help!
If you have some brilliant organising tips I'd love to hear them!

So, that said, here's my share for today.
Every November a music festival is held behind our Art Gallery,
this year they had a dedicated youth stage. So my boy got his mates together
and they played a half hour gig to a large, and very appreciative, audience.

Here's the story


I'm still using up the last of my 'Something Wonderful' stash.
This range has made so many pages of such varying style and theme, so versatile!
I used a card from the gourgeous 'Bella Rouge' range (another one of my faves), for my title.


To add a bit of colour to the background I picked up the teal and red from the patterned papers
using Distress Oxide inks and a splatter brush. The brushes are currently out of stock but
if you msg Kylie through FB (in business hours) she can let you know if they are still available.
Definitely worth having!


To keep the page quick and easy (it took me less than 30 mins)
I used Dymo for the pertinent information, and PaperMate correction tape (Wideline) for the story.

I'm all about the quick bursts of creativity when there is so much else I should be doing.
I think it's important to maintain the practice of being creative even if it seems impossible at times,
half an hour is always doable. It keeps me connected, and sane!

So, now back to the purge and sort!

Hope you have a wonderful Festive Season.
However you celebrate, may it be filled with good company and tasty food.

Until next year,
stay arty,

Sunday, 10 December 2017

How are you going with our Christmas Challenge??

Good Morning Arty Peeps!

Happy Sunday!
I hope your weekend is going swimmingly.

A simple share from me today, something that's been waiting in the wings
for a particularly busy time, as it is this time of year.


A background made with heavy weight cardstock and yellow Dylusions ink spray. Patterned papers, stickers, and chippy alpha and Viewmaster sticker from the sweet Teresa Collins 'Something Wonderful' range. The flourish is an old foam stamp I have, used with the green paint from this pack.
There is also a piece of Hambly transparency behind the main photo.
I journalled with a black pen and added the date with a stamp
and some black ink.

Hope you are getting some creative time at this often frantic time of year.


Playing along for the chance to win a new WeRMK sewing machine, and be featured on our blog.


You have one week left!
Upload your projects here.
I am so excited about this competition!!

'Til next time,
stay arty,


Tuesday, 5 December 2017

Travel Themed Junk Journal

 Good Morning Arty Peeps!

How is your December going? I hope you are taking some
creative time for yourself amongst all the festive chaos.

I Spent last weekend finishing the Junk Journal I made in Lisa's class
at Gundy Scraptacular in November, I used it to tell the story all about the trip.

The cover is coloured with Dylusions spray inks and BoBunny glitter paste
through some Kinder Kreations stencils.
It's so bright and sparkly!


I continued the colourful theme the whole way through, adding Dylusions acrylic paints
(applied with a wet wipe) and vine stamp to patterned paper pages. 


I used up lots of stray leftovers for embellishing - Something Wonderful tags, washi tapechipboard elements, and enamel shapes, (such a great range for mixing with anything).


I cut out bright bits of patterned paper from a Heidi Swapp 6 x 6 pad, and used Studio Calico chippy hearts to make page tabs, sticking them back-to-back over the page edge.


These Kaiser stickers were so appropriate for my theme, they are sprinkled throughout.


You'll also see some Heidi Swapp acetate words, Memory Maze chippy arrows, My Mind's Eye enamel dots, and paint pens used in this little album.

I love how this turned out and it was so quick and easy to throw together using just leftover products. Made of 12 x 12 papers folded in half and stitched down the middle, it's a really easy book to make.
I am definitely going to do another, maybe for a December Daily!

A perfect keepsake of an amazing trip!

Stay crafty, and remember this amazing challenge.


Thanks so much for coming by,
'til next time


Monday, 6 November 2017

Fabulous Nov Mood Board - by Chloe

Hello there!
Have you seen this month's mood board yet? It's quite dramatic!


Such a vibrant board, isn't it!

I was inspired by the colours, and the grid design...


I used the Something Wonderful 6 x 6 Designer Pad for the background papers -
I've wanted to do this design for a while using 6 x 6 papers (no cutting to size ;) )...  and this was the perfect opportunity!


I just love that street map washi tape - so versatile and fun :) It also hides the paper joins ;)


That gold word thicker is so hard to photograph - but so awesome to use!

Products used:


Hope you can play along with our challenges this month.
 

Tuesday, 8 August 2017

Pool Side Fun - Layout by Tania

Hi lovely people!! Today I have my take on this month's Sketch!! (Which is here if you haven't already seen it!)


I loved the simplicity of this sketch, although, because of the size of my photos, I had to change the photo placement slightly, but that's ok. A sketch is designed to get our creative juices flowing! If you want to change it around slightly, you can!


 I am using up more left over bits from my DT kits! (Teresa Collins, Something Wonderful & Pink Paislee Atlas ranges.)

The papers are from the Atlas collection!
The embellishments, washi tape and tag are from the Something Wonderful Collection, and there are some cute little wood veneer arrows from Studio Calico. (I painted these black!)


The cute little star stamps are from Heidi Swapp, these are great for your dates, and the tiny stars, added just a little more to my white space and helped highlight my embellishment clusters.


I cut one of the tags from the Teresa Collins, Something Wonderful ephemera and tag pack, into two pieces and used in different spots under my photos. Then I embellished with stickerschipboard stickers, stamps and patterned paper. The small alpha stickers are also Teresa Collins. 


Some of these Teresa Collins products are on special in the Scrappingclearly store! head on over if you see anything here that catches your eye!!!

Hope you enjoyed my layout today! Have fun playing along with this month's challengs!

Tania


Thursday, 6 July 2017

WK29 2016 with Melinda

Hey there ScrappingClearly friends, Melinda here with you today sharing my latest DT project!

Today I have a PL spread to share but before I do have this photo to share with you!


Can you guess what that is?! That is all I have left of my 6x6 paper pad from the Teresa Collins Something Wonderful range! Does it excite anyone else to get this far through a paper pad?!

Anyways, onto the details of our Week 29 for 2016.

Here is the front of the spread


And the back


As you can see I have used lots of the different patterned papers for my cards - I do love to use 6x6 pads for exactly that reason BUT I find myself with a stack of 2x6  strips that I am never sure what to do with! I totally lifted this idea from another very talented PL scrapper Angus K - so a big thank you for the idea!!

You can see here I have just stuck together 2 of the 2x6 strips of paper (using the "branding" strip as the joiner) together to create my 4x6 cards and I so super love this look!! And it's SUPER easy using a paper pad because all of the designs work together!

You will also notice, this is not the best photo, it is quiet blurry but the only photo I got of myself and my boys at the movies so I turned it black and white and the quality is good enough ;)


Here are a few more close ups!

I had enough of the full 6x6 papers left that I was able to also cut 3 4x6 cards from one paper which I think gives a nice balance.


All of those 3x4 cards, know what they are?! They are from the same collection but they are the Ephemera Tags! I have simply chopped them down to size and decorated and journalled on them the same way I would with another 3x4 card. AND using the tags this way means I have extra "ephemera" pieces which you can see in a couple of the close ups above!


I have also used some of the washi tape, enamel dots, decorative buttons, ephemera pieces, word stickers and chipboard elements from the same collection to do a little decorating (AND lots of those pieces are currently ON SALE in the shop right now!!). I added in a little stamping using these stamps from the Heidi Swapp Magnolia Jane collection and finished off with some machine stitching and thickers from my stash!

I hope you have enjoyed this post and that perhaps you now have a different way to use up those left over 6x6 pattern paper bits!!

Until next time, happy scrapping!

Melinda