Thursday 30 June 2016

Baby It's Cold Outside

 Good morning scrappy/arty peeps, hope this day finds you well and happy.
The weather here in Armidale has been dreary, cold, and wet (my fave) so very conducive to getting messy indoors by the fire.

I've been playing with the divinely colourful Ranger Dylusions paints. I used an old loyalty card to scrape paint across some Bazzill Marshmallow cardstock, it's heavy weight and specially made for mixed media, awesome! Then, because I wanted the colours to pop more, I cut out my background and mounted it on black card. I borrowed a Prima texture brush (these are so fab) to swipe a little white paint over the colours to tone it down a tad and add some depth.

To create a diagonal visual line across my page I sponged black ink through a star stencil then added my pic and journalling on top. My 'love' subtitle was gold foil and didn't match so I coloured it using a Copic marker.

Washi tapes were used to create a sense of movement and for my big title I inked Pink Paislee Bella Rouge transparent letters (have I said how much I'm loving these? The pack just seems to go on forever!). I attached them using some really old tiny screw brads from my stash, Tim Holtz, I think.

The longest part of this creation was the drying time for the paint, the rest was super quick and easy.
Hope you're finding some creative time with this cold snap, if not then shopping for luscious supplies is a nice alternative. I spied some gorgeous new Dusty Attic chipboard today in the shop.

Til next time

Wednesday 29 June 2016

Gelato's, Paint Stamps and Stencils

Hello everyone and welcome to my blog post. Today I am sharing some mixed media creations.

I have used the the following amazing products from Scrappingclearly's awesome shop Ceramcoat Paint, Gelatos, Dylusions Stamps and The Crafters Work Shop stencils.  

I just love the intensity of the pigment in the Gelato's and the more you layer the colours and blend them the greater the depth of colour achieved.

You can see from the snapshot the depth of the colour.


The small 4" x 4" stencil from The Crafters Workshop is just awesome for art journaling, I have used a white paint pen from Dylusions to highlight around the silhouette and it has just popped it so well and defined the image.   


I have loved the way this page worked and the intensity of it. So many different  stamps also used.
  

For my second share I have used lots of different paints available from Scrappingclearly I have used Ceramcoat, Dylysions and Dina Wakely's and as you can see they have all blended exceptionally well together. As well as various stamps from the Scrappingclearly range.
  

On this page I have used all the above products again and just adore how it has all come together. 


I would like to give credit for the inspiration of these pages to the Bad Ass Art journaling classes.

I hope you have enjoyed my share with you for today i will also be sharing my take on the moodboard later today, please come back for another look.

Kim Kendell   

Monday 27 June 2016

HAPPY PLACE card set, by Tania

Hi all you lovely, arty, crafty people!!! Today I am sharing with you a set of cards made with the beautifully, delicious papers in the Dear Lizzy, HAPPY PLACE collection!!! I really love this range, so versatile and so bright and funky...

For my first card, I just used strips of the different patterned papers, and then I had this gorgeous pineapple washi tape in my stash to compliment them! The Die Cut Phrases are from the HAPPY PLACE collection, they are cool, some of the pack are coloured and the others are left blank so you can colour them yourself! (As I did in the card below, using Distress inks and water.) The cherry embellishment was made with Archival Inks and one of the stamps in the HAPPY PLACE, matching stamp set!! (These are too cute!!!) This card was also made for a special occasion, hence the no. 18. I couldn't go wrong with the gold foil alpha thickers!!!


For my 2nd card, I've layered up a selection of the HAPPY PLACE papers, and popped some 3D foam tape on the left side to add some depth. I used my favourite stamp, the sunglasses, from the same set as above, and stamped it onto white card 3 times. I coloured the centres of each one with Distress inks and a water brush. The cute little pink sequins are from a Studio Calico pack.


For my last card, I wanted a touch of watercolour and used some gelatos and a spray of Heidi Swapp colorshine spritzed with water. I attatched some strips of patterned paper as before, making a little fringe out of one of the strips. The 'life is a party stamp' is also from the Dear Lizzy set. I mounted another little sunglasses embellishment, (told you that was my favourite stamp!), then finished with a die cut phrase and some more of the cute, pink sequins!!! I felt it need something else, so just used a pink marker to give my card a border.
I hope you like them, and I can't wait to show you my next project using these colourful and bright papers!!! If you like the products I've used, most of them can be found in the Scrappingclearly store, I have provided links for you within the post. 
Thanks for taking the time to take a look!!


Sunday 26 June 2016

Another Book of Me layout

Good morning everyone, well Winter  has certainly hit in Victoria - 3 degrees this morning !!

Today I have another layout that will go into my Book of Me Album.  I tried something different on this Layout - a beautiful stencil and paint mixed with Faber Castell Glass Glitter Gel - (you will be seeing more examples using this amazing product in the near future.

I used this gorgeous stencil from Crafters Workshop http://www.scrappingclearly.com.au/shop/group/the-crafters-workshop-12-x-12-templates-circles-in-lines/ and through the stencil I used Liquitex  Heavy Body Acrylic Titanium White mixed with Liquitex Heavy Body Acrylic Magenta, I mixed these two paints with Faber Castell Glass Glitter Gel 
- Oh if you have not tried this amazing Glitter Gel - do yourself a favour - it's so versatile and the effects are amazing - love the texture!  I also used some beautiful Heidi Swapp embellies - the "me" and the "happy" are from her  Believe Christmas Ephemera pack. I love how they team so well with this layout.

I also used my trusty typewriter, and White Marshmellow 250GSM cardstock and Bazzil Black Raven cardstock  which has proved to be so popular it is out of stock but will be restocked very soon.  I have also used my favourite Pilot Permaball Black pen  - if you haven't tried them, do try as they are amazing for mixed media, canvasses no smudging!
I coloured the muslin with Dylusions BubbleGum Pink and also used white muslin, by colouring white muslin you can match your colour scheme of your layout - and it dries easily.


Thanks for visiting our blog, I look forward to seeing some more of your "Book of Me" pages - if you upload them to our Community Page on FB - there will be a random draw from my stash for the first 3 pages up by 1st July!

Happy ScrappingClearly!

Love
Marellexx

Friday 24 June 2016

Friday Mixed Media with Lisa Oxley

Howdy Bloggers, Lisa Here with a late Friday update 
Yep hanging my head in shame here .
Today I am going to share just a couple of things I've been playing with this week.
Nothing big, in fact I feel like I don't really have a lot to share,but something is better than nothing.
 I love drawing faces and playing with eyes and details.
I Love this green-eyed girl.
Again using the awesome Dylusions Journal and accompanying paints to create this fun piece
She still need a little fine tuning ,but she is is radiating peacefulness.
 Its always fun to throw the unexpected into ones work and the little dangles hanging from the eye are just that . I still need to add some journaling and I have been screen shooting quotes and inspirational writing for times just like this .
I also created this piece last week and would like to celebrate that
 Jason Anesbury is now its proud owner.
Created with a combination of CWS ,Stencil Girl and WOW Stencils, Acrylic Inks from Liquitex,  Dylusions and Dina Wakley Acrylic paints and the amazing Colour blast textured paste .
If you want to know how to make it check out the Colour Blast Blog Here
Thanks for dropping by the blog , See you next week 
Lisa xx

Thursday 23 June 2016

"Max Brenner " layout by Bernii Miller

Hello...


Bernii Miller here with you today sharing another layout I made with some Heidi Swapp goodies  that you can find win the shop HERE

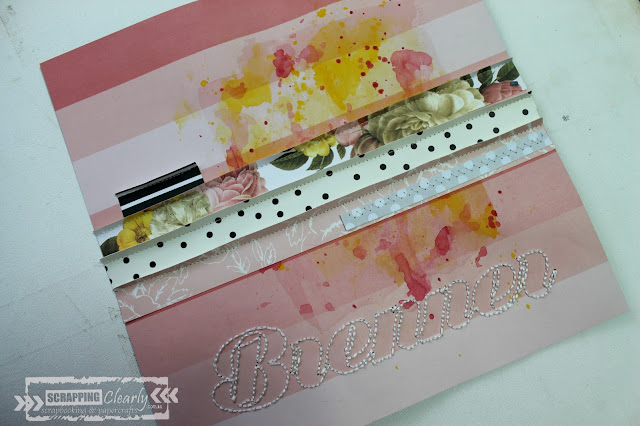
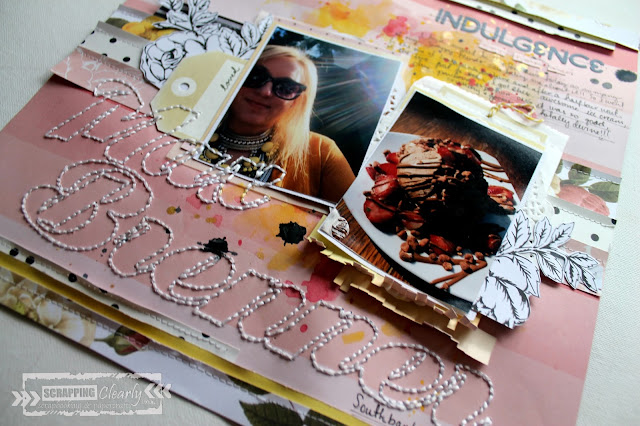
So I have been watching with keen interest in the gorgeous scrapbooking layouts I am seeing about, with the hand stitching titles. I have wanted for so long to try it out and finally I bit the bullet and had a go .. and I must say I am so happy with how it turned it out. 


 To start with I cut strips of Heidi Swapp paper and adhered them down with my sewing machine. I then found my favorite font and went ahead and sewed it by hand onto the page. 


"Max Brenner " layout by Bernii Miller for  Scrapping Clearly.


I then played around with some gesso and watercolours to create a little mixed media background. 


"Max Brenner " layout by Bernii Miller for  Scrapping Clearly.


"Max Brenner " layout by Bernii Miller for  Scrapping Clearly.


"Max Brenner " layout by Bernii Miller for  Scrapping Clearly.


Thank you so much for stopping by today and I hope I have inspired you to play with some pretty papers and get creative. If you love these papers as much as I do then please make sure that you check out the ScrappingClearly shop HERE

Till next time 

Much love 
Bernii xx

Wednesday 22 June 2016

Happiness together - by Chloe

Hello everyone!  Hope you are keeping warm in this chilly weather - perfect weather to scrap ;)

I'm sharing another page I created with the gorgeous Maggie Holmes Bloom collection.  This range was just so EASY to use ... it matched a wide range of my photos that the hardest part was narrowing down which pics to use!


This is a pic of my daughter with her bestie - so cute they are! Love the fun mix of colours and patterns in this range.


See the Webster Pages Trimmings in Lavender - I glued the strip onto a circle of cardstock to make a flower :) worked perfectly!


Other products:
Maggie Holmes Bloom Chipboards with Gold Glitter Accents 12×12
Cocoa Vanilla Hello Lovely -Sequins
Maggie Holmes Bloom Paper Flowers 16pc
American Crafts thickers Gold Foil

Dreamy Glitter Paper Frames
Crate Paper – Maggie Holmes Collection – Bloom – Delights with Foil Accent
Maggie Holmes Washi Tape Sticker Book
Heidi Swapp Dipped Tags Pink

Tuesday 21 June 2016

Project Life week 7 - With Karyn!

Hi Scrapping Clearly Lovelies!!! 

It's Karyn here and today I'm showing you Week 7 for my "Schultz Family 2016" Project Life Album. Made using the new Pink Paislee "C'est la vie" collection available at Scrapping Clearly. 

I love the pink and black colours of this collection - very pretty and girly
Here is a close up of the LHS. The "Hello" card is an acetate card cut from the sheet backed with a white card. I've also made my own filler cards using white cards and strips/triangles of patterned paper from the collection.
These shaped paperclips are my favourite - the whole packet has been used up already!
One of the sheets of paper had lots of squares/rectangles of different sizes, patterns and words. I cut it completely up and added the words to my filler cards. The puffy stickers and some enamel dots were perfect embellishments.
Here is a close up of the RHS. 
The "Boss babe" and "Breath of fresh air" cards are acetate backed with white card. I then made my own filler cards with the paper, puffy stickers and another paperclip.
The "Week seven" card was a digi printed onto a white project life card then I added a strip of washi, a date stamp and some enamel dots. 

What do you think of Rachael's box opening technique?? You should see how she opens CD/DVD cases!!!!!

Scrapping Clearly products I've used include

Pink Paislee "C'est la vie" collection (papers, acetate, washi sheets, puffy stickers, paper clips) 
Becky Higgins - white project life cards 
Becky Higgins - grid project life cards 
Date stamp (similar to this) 

All of my photos have been printed on an Epson XP-600

Thanks so much for stopping by

Crafty Hugs xx
Karyn

Monday 20 June 2016

Brothers make the best mates with Melinda

Hi there and welcome to the blog today! Firstly, apologies for the delay in this going up, it's been one heck of a day but it's here and I hope you like it!!

My very talented father in law took this absolutely gorgeous photograph of my 2 boys at a sleep over a few weeks back and I couldn't wait to scrap it!

I knew straight away I wanted the photograph to do the majority of the "work" on this page so have gone very clean and simple and have used the absolutely stunning Maggie Holmes Bloom collection.

Here is my completed page


As you can see I and I said earlier, I have gone very minimal on this page but I did hand stitch that title. Which took like, forever. BUT I LOVE how it turned out and love this whole layout. 

I have used the gorgeous reverse side of the "Flutter" paper for my background - I had to stock up on this piece - one for the butterflies to be fussy cut, one for this gorgeous side and for, well, it's pretty, so "just in case" ;)

And here is a close up of the title area


I have paired my hand stitching with the gorgeous gold glitter thickers from the collection and also the XOXO from the ephemera pack.

I don't think a more accurate photo of these 2 together and their love and sense of fun and cheekiness has ever been taken!!

I used a piece of that gorgeous gold vellum to back the photo and also a doily from my stash. 


I've pulled out the "so sweet" and "love you" little word strips from the ephemera pack. Also, that gold glitter heart and the yellow heart.

You can't see it at all but I have attached a little envelope behind the photo for me to put in a letter to the pair of these boys to find when they get bigger. I didn't want to add any extra to the page but I wanted them to know what this photo means to me as their Mummy :)

And here is a shot of the envelope hidden behind and between the layers


I think I said it already but I seriously love this photo of them and love this page! My FIL managed to capture so much more than their smiles in it and when I first saw it it brought a tear to my eye :) Yep, I'm a sook, haha!!

So, again, apologies for the delay but I hope you love my layout!

Thanks for stopping by!
Melinda

Sunday 19 June 2016

Project Life spread by Tania!

Hi everyone, hope you are all having a lovely weekend! We've got the V8 Super cars on here in Darwin, so might go and check them out today! 
I have a Project Life style page for you this time, using the very sweet HAPPY PLACE collection from American Crafts and Dear Lizzy. I looove this collection!!! All the watermelons and pineapples, flamingoes and birds, so cute!!!!


I'm still a relative newcomer to Project Life, I have recorded some holidays using this form of scrapping, but haven't used it in the form of a scrap your year type album. I don't think I could cope with the pressure. I do however, think it's a fabulous way of recording holidays or special events where you have alot of photos. When I saw this paper, I knew that it was perfect for this style. the Top Notch paper had the 4x6" and 3x4" cards ready to be cut. I used nearly all of them for this spread.


To compliment my page, I used some of the butterflies and embellishments from the Maggie Holmes BLOOM range, including one of those cute little Maggie Holmes BLOOM rubber shapes and some of the washi from the Maggie Holmes BLOOM washi tape sticker book! There's also a cute little heart from the Dear Lizzy HAPPY PLACE glitter stickers! My title consists of some Heidi Swapp alphas and a die cut word, plus the shiny Gold foil Thickers.


In my kit there was a gorgeous  Dear Lizzy HAPPY PLACE small stamp set, which I have used for the little sunglass & camera embellishments. They looked a little plain on white cardstock, so I just gave them a little watercolour with Distress Inks and a water brush to mimic the watercolour look of the hand-cut butterflies.


I used the sweet Dear Lizzy HAPPY PLACE specialty paper/acetate to make a little transparent pocket for some Studio Calico SEQUINS. I just put a few drops of Glossy Accents along the top to seal the pocket and keep those sequins inside!!!


So there it is! I love how quickly and easily these pages came together, and I still have plenty of gorgeous papers left to play with in my kit! See you next time with some more scrappy inspiration!!

Saturday 18 June 2016

Quick Page


Howdy Scrappers
Peg here today to share a simple page done almost completely with
pack of ephemera. Plus the obligatory spray inks.


 I started by cutting out and inking the edges of all my elements
and Ephemera pack. I layered them under and over my photos.


The @ is a punch I have, the title is from a Pink Paislee
Bella Rouge transparent alpha, must say I am getting lots of mileage
out of this pack, and loving it! The flair is again from the
Cocoa Vanilla 'Made of Awesome' range, there are 6 in the pack.


And I finished it off with some splatters of Heidi Swapp

Thanks for coming by, see you next time