Thursday 29 April 2021

Art Journalling - With Karyn Schultz!

 Hi Scrapping Clearly Lovelies!

It's Karyn here and today I have some art journal page that I created using lots of fun Art-By-Marlene products available at Scrapping Clearly
 
 
I was also inspired by the "#happyaprilfoolschallenge" prompts in the Art-By-Marlene creatives facebook group. I love Art-By-Marlene products, they are so fun, bright, quirky and happy. You definitely need them in your crafty lives!
 

 These pages are the first 8 prompts in the challenge and I've used an Art-By-Marlene journal, paints, stamps, stencils, sticker quote books, and of course the fabulous die-cut books (I have 6 of these lol)!
 
Day 1 : Just Foolin' around
 
 
 Day 2 :Up In The Air

 
 Day 3 : Sweet Tooth
 
 
 Day 4: Down Under
 
 
 Day 5 : Birds View
 
 
 Day 6 : Blues
 
 
 Day 7 : Bling
 
 
 Day 8 : Circle Mad

 
   Thanks so much for stopping by!
 
Crafty Hugs xx


Wednesday 28 April 2021

Mermaid love, by Amanda Hartmann

Hello friends!

Today I share some mermaid love!

Here are the links to products in store used to create my page:
* Dylusions paints (for bubble background): Tropical Sangria & Periwinkle Blue
* Vicki Boutin Gel crayons (to colour the mermaid)


So much fun technique on this page!


Here is the page...

1. I mixed Dylusion paints with dishawashing liquid and water in a cup. I blew bubbles in the cup and used the bubbles to add the bubbles of colour to the background.

2. I stenciled the mermaid with white modeling paste

3. I coloured the mermaid with the VB gel crayons. You can draw directly on the surface (over the stenciled image) and then mix the colour in with your finger and/or a wet brush.


I think the page turned out pretty cool in the end. I need to pay some more with the Gel crayons - I will keep you posted!

Amanda


Tuesday 27 April 2021

Keep Searching by Tracey B

 Hi everyone and happy crafting Tuesday

My mojo has been missing in action lately and my usual remedy (a play on Youtube) failed to inspire me.    Instead I started sorting through my stash and came across on unopened package.

Suddenly I knew exactly what I wanted to do.

I started with some white card stock that had some left over product from a few different layouts already on it.


I always do this with any leftover mediums as I'm not into wasting products.
I added a few more splatters (Dina Wakley gloss spray Ocean) and some teal Heidi Swapp Metallic texture paste scrapped through an old Tims Holtz stencil (Dots Fade) and some delicious Art Extravagance Icing paste (Old Silver) through a Vicki Boutin stencil.   I painted some wood veneer circles with some gesso and then some Dylusions Ink spray (London Blue).   


I added some vintage Heidi Swapp ghost letters that I had been hoarding and some muslin and finally some of the Art Ingredients Melange Art Pebbles that inspired the whole layout including the photo!


      Happy creating

cheers

Tracey


Sunday 25 April 2021

Updating old creative pieces with Lisa Oxley


Howdy Bloggers, Lisa here with a Sunday Scrapping Clearly mixed media update.
Something a little different today. 
Creating for the #100dayproject has its grips on my creative heart, but sometimes one Has to create something a little different for the soul.
Case in point below.

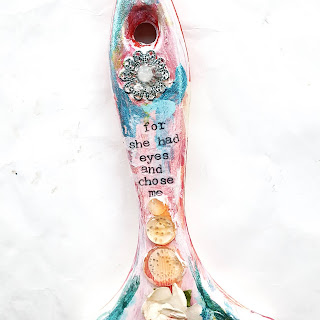
This paint brush has been in my finished pieces for years, 
shabby chic dressed and ready for dust collection..
Recently I came across an artist on Instagram @hannahroseillustrations who 
is painting eyes on paint brushes.
Hello Inspiration, and welcome an old piece, remade for a more up to date me.


A layer of textured paste and another of gesso and I was good to go.

Acrylic paints make the biggest impact.


It even falls into line with next months More Than words challenge...
But I thought Id share it here, and made another for MTW.

Maybe take a look at your old creative pieces, and see if there is something you can tweak.

Ill be back in a fortnight with a new mixed media update.

Thanks for dropping by the Scrapping Clearly blog.


Saturday 24 April 2021

Fabulous day by Tracey Thorne

 Welcome to another weekend to get your creativeness out and onto paper. I was feeling a little stagnant over the past couple of weeks so when I was on holidays I just prepped a lot of white cardstock with random backgrounds. Todays share comes from one of those backgrounds I created whilst on holidays - limited art goodies and a tiny coffee table were all I had to create on - I did sneak the minc in though which helped inspire me to come up with this colour combo.

Firstly I brayered Dina Wakley Penny acrylic paint onto the background and whilst still damp layered a 12x12 stencil on to that which I used a damp wipe to rub off some of the paint. It became one of "those mistakes". As I lifted the stencil it started to rip the paper as the paint had dried considerably fast. I have then added the stencil again once the paint was completely dry and used Liquitex light modelling paste with it. I was really happy with the texture these two steps had achieved.


I created a border for the photo using my sewing machine & black stitching. I have also done the same thing around the outside.


The silhouette machine was used to cut out some leaves and to these I have added Minc foil in Irridescent Teal. 

I have also embellished around the photo using embelllishments using Prima latex moulds. I have coloured the bee by using alcohol inks in butterscotch, terracotta & pearl. The remainder of the embellishments were then coloured by using the Prima Art Alchemy waxes in old silver & rich copper and rubbing them over the item.

 I have then used some muslin under the photo to help soften the page and link it to the page.
The page was finished off with Heidi Swapp epoxy words to create the title.


A nice simple layout with lots of shimmer to hold a lot of fabulous memories.


I hope you are having an extremely creative start to your weekend. If you are looking to do a bit of shopping don't forget to pop into the shop as Kylie has a little bit of a sale on at the moment - you can check out the facebook page for more details.

tracey

Friday 23 April 2021

Memory with Belinda Spencer

Hello Scrapping Clearly peeps!!

It's Belinda here today to share my latest layout for Scrapping Clearly featuring some stunning products from the store.


'Memory'


I started my layout with a sheet of gorgeous patterned paper from the 49 & Market Old School Mini Paper Collection. This is such a cool paper pack that also includes a 12 x 12 sheet of die cuts. The paper I chose is just one sheet even though it looks like a whole bunch of layers stuck together. I love this look so much but it was messing with my head trying to keep my photo straight on the page!! LOL I solved this optical monkey business by placing a metal ruler inside the right hand side and lining my photo up with that. So much easier!

I used the Mini Mosiac Squares 6x6 Stencil from The Crafters Workshop with some black gesso on the background.


Next I wanted to have a play with the brand new Vicki Boutin Colour Study Stamps so I added some of those to my background using Ranger Jet Black Archival Ink


I wanted to make it a little more grungy so I sprayed some Black Marble Dylusions Ink Spray on and let it drip. I also flicked some Heidi Swapp Tea Colour Shine over the top (once the black was dry).


Then I created a stack of papers using some die cuts from the 49 & Market Everyday Artistry Ephemera Stacks (that I had in my stash), a die cut from the Old School Mini Paper Collection, book paper and a torn piece of Heidi Swapp 6x6 die cut paper. I shuffled all the bits around and then stapled them together in the centre before adding to my page. I added some messy black thread on top of the stack.


I stamped some bugs from the Tim Holtz Stampers Anonymous Specimen Stamp Set onto some 49 & Market Everyday Artistry paper using the Jet Black ink. I fussy cut each image and slipped in around the photo stack. Then I added my photo.


Finally I added some Mini Metal Stars by Prima, some large black sequins, quote stickers and the title. For the title I used a Heidi Swapp Wood Veneer word that I inked with the Jet Black ink. I used a white Posca Pen to decorate and make the word stand out more. I used the star from the Vicki Boutin stamp set to create star embellishments.

Here's what I used:
49 & MARKET Everyday Artistry Paper & Ephemera Stacks
black gesso
PRIMA Finnabair Mechanicals Mini Stars

Thanks so much for stopping by the blog today.

Cheers
Belinda


Wednesday 21 April 2021

Cute, by Amanda Hartmann

Hi SC team!

Have you seen the beautiful 13@rts Transparency sheets?


And then this Vintage Collage beauty:
which I have used on my page today.

For colour, I used Tim Holtz Distress Oxides as watercolours.


To create this page, I made templates of the circles on the transparency so I could paint the circles to the white background. With circles drawn on the white cardstock background, I painted each circle with Distress oxides. I also used some plastic packaging to smoosh more colour onto the background.'


This page was then easily assembled - I put the transparency over the painted background - and done! fastest layout ever! LOL.

I layered my cute photo with some paper and a doily and finished with some simple stickers and stars.


You guys.... go get some of these transparencies - before they sell out!!!!

Thanks for looking!
Amanda


Tuesday 20 April 2021

Excited? Way! by Tracey B

 Hi everyone.

Still coming down from the fabulous Easter cyber crop so here's a quick layout inspired by this month's moodboard.


I started with some white card stock and glued down some Dusty Attic chipboard and covered the whole page with  13@rts gesso. 
I then scrapped some Light & Fluffy modelling paste through a Vicki Boutin Star Stencil and a Dusty Attic stencil.

I dry brushed on some Art Alchemy acrylic paint (Mettalique Pure Sunshine, Metallique Light Patina and Sparks Butterfly Spells and toned it down with some more gesso.

I added some splatters of Dylusions Ink spray (White linen) and then some of Colour Blast spray (Road Base) which I do regret as it spread more than I wanted.

A Heidi Swapp acetate word, a  flocked acetate sticker and some of Teresa Collins Something Wonderful chipboard and alphas and I thought I was done.
At the last minute I decided to add a few more elements using a Heiidi Swapp Sticker Foil kit (Similar to this).   They didn't show up well in the photo but were super easy to use!

Here's also a couple of pages that I didn't get around to sharing over Easter, ooops!.


 Happy crafting Tuesday

cheers
Tracey


Sunday 18 April 2021

A bit of Whimsy - by Emma Zappone

 Hello SC friends.
Emma with you today on the blog.😁
The project shared today was inspired by this months mood board.
Beautiful soft pastel tones to play with.


Soft pastel colours are not always easy for me to play with, but this board is just scrumptious.
I already had papers in my stash I could play with and I knew I really wanted to use the Aall & Create Lotus Clusters stamp set. So I stamped a couple of the images onto the papers I had chosen which complimented the board perfectly, and fussy cut them out. 


For the background work after priming my paper with clear Gesso I smooshed 2 Distress Oxides - Tumbled Glass and Squeezed Lemonade, these pulled the colours from the already coloured background out. I then added 2 Dylusions acrylic paints - Rose Quartz and Island Parrot with a palette knife over the background to add more colour and visual interest.


The acrylics were a bit on the bright side so I muted them with White Linen to create more of the pastel tone. Next to create more texture, with modelling paste I added a layer using Stampers Anonymous stencil mini set, then with the same lotus cluster stamps I added them to my background along with a few of Tim Holtz Field Notes stamp set.


Once happy with the stamping and all layers were dry, I built my paper layers up. Adding those fussy cut stamped lotus flowers in amongst the tag layers. A nice big resin and some large glass domes to reference the photo this layout was complete. 

I love it when a project comes together easily and feels good.

I hope I have inspired you a little.
If you have yet to play with this board, maybe now is the time.😉

Catch you all again soon.
Em xx