Saturday, 7 April 2018

Art Journalling - With Karyn Schultz!

Hi Scrapping Clearly Lovelies,

It's Karyn here, 
and today I have some Art Journal pages to share with you
made using lots of fun products available in the Scrapping Clearly Store.

I love art journalling. I love that there are no rules and that I can experiment with techniques before applying them on a scrapbook page. I love looking at all the wonderful masterpieces that other art journallers create. I struggle at times though with finishing off my pages. I love to work on the background but then I struggle with the "final layer". In scrapbooking you have a photo - now I need some other element. I think that part of my problem is that I love the background and dont want to cover it up!!

I recently purchased the 6 newest Dylusions paints (Peony blush, Mushy Peas, Laidback Lilac, Periwinkle blue, Vanilla custard, Rose quartz). Initially I wasn't sure of the colours. They seem quite pastelly compared to the other colours in the range - but I now LOVE LOVE LOVE them!!


I started by using a spatula to apply them to my pages. I started with the lightest colours and worked my way through to the darker colours. 


Then I used an old credit card to add some black paint swipes. When this was all dry I used a honeycomb stamp with Ranger Archival ink pads (black, green and pink). I'm loving using Archival ink pads at the moment as they are permanent ink and perfect for art journalling. Next I added some splatters of carbon black Liquitex ink and lime Tattered Angels chalkboard glimmermist

Next I stamped a variety of Jane Davenport Mermaid stamps on a scrap piece of paper that I had been swiping excess paints on. I cut these out along with a seaweed shape to place on my page. 


Here is my finished page. I also added some Tim Holtz small talk stickers - my fav stickers!! 


Here is a close up of my mermaid peeking out from behind the seaweed. I also added some sparkly glitter glue in places. 


Since I was having so much fun with these colours I made a second page. This time in my Small Dylusions journal


I started by covering my pages with the Peony blush and Vanilla custard Dylusions paints, then adding swipes of Rose quartz, Mushy Peas, Laidback Lilac, and Periwinkle blue


Then I used an old credit card to add some black paint swipes. When this was all dry I used various stamps with Ranger Archival ink pads (black, green and pink). Next I added some splatters of carbon black Liquitex ink and lime Tattered Angels chalkboard glimmermist .


Next I stamped a Jane Davenport Mermaid stamp on my page and highlighted parts with sparkly glitter glue. I added some Tim Holtz small talk stickers under my mermaid then added some marks across my page with Posca paint pens


Thanks so much for stopping by 

Crafty Hugs xx


Friday, 6 April 2018

#The100dayproject

 Salutations Bloggers,
Lisa here, welcome to Friday's Mixed Media Update .
Today I'm sharing a fun challenge to assist you in what ever art or craft you partake in.


Is a fun challenge to participate in.
Follow the link if you want some information.
Basically one picks a theme, creates for 100 days straight,
 hashtags it, and shares with the creative community!
I can hear the gasp of shock from some, but really, it doesn't have to be a scary prospect,
 rather a personal challenge just to do something everyday.

It is an Instagram challenge, 
but one doesn't have to be on Instagram to partake in the fun, 
of course you could just start creating for yourself.
  This challenge started on April 3rd.
Here are my first three pieces.

"Art Makes Me Happy"


 "Do Not Feed The Fears"


Dina Wakley collage words


"Dance to the song of the Sea"


WOW scales stencil


Thanks for dropping by the Scrapping Clearly blog,
 I'll be back next week with some more arty goodness to share with you.
I hope you have a super creative week ahead...
 Maybe even start 100 days of creativity.


Lisa xx


Thursday, 5 April 2018

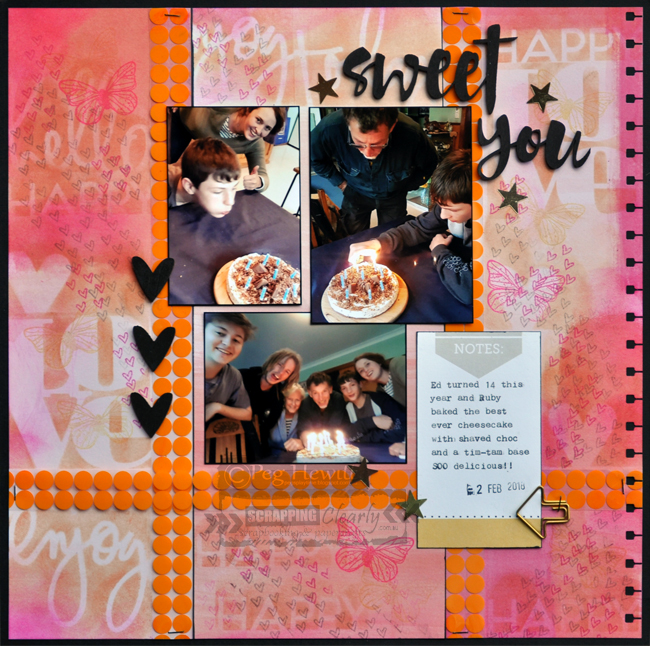
A Couple of Multi Photo Layouts by Peg

Hello Arty Peeps.

Life has been so full at my place lately that there has been precious little time or motivation for scrapping. Unfortunately, that doesn't stop the need to get stories in albums, but it does make the process so much more difficult, don't you think?

In an effort to simplify the job I decided to pull out a few things that were the last of a range. I always feel better when I can finish a paper range I have or a pack of something. The sense of completion combined with the anticipation of using something new is a heady mix.

This time it was the fabulous Teresa Collins Something Wonderful range.
I have loved this range so much for its versatility, it is so easy to use for simple pages that look more complex.


I used this paper for my base, this paper for my cards, and matching washi tape to add some energy to my page.
I also had some of the Pink Paislee Fancy Free range left over so I used this paper, added a punched border and some black cardstock, to mat my photos.
My title was done with a Pink Paislee acetate alpha, I added a few enamel shapes (hearts), and stapled things on with my Tim Holtz tiny attacher.

I also used this paper from the Pink Paislee Fancy Free range to start this page.
The other half of this paper became a strip down the middle which I edged using some Hambly transparency, stapled on with my Tim Holtz tiny attacher again.


I was at a loss with how to finish it after adding my typed and dated journal spot so, deciding that it needed more interest in the background, I reached for my Ranger Archival ink pads and some little Heidi Swapp stencils. I added some stamping too with these adorable stamps, and some wood veneer coloured black, both from Cocoa Vanilla Studios. Some star sequins and a cute paper clip finished it off.

This page started to take shape once I'd punched out the edge and mounted it with a black border. I could see exactly what was needed once it was 'framed'. Does this ever happen to you? You're stumped until it's framed?
As a side note, I always save the middle out of the black cardstock backing,
it's handy for matting photos, which I almost always do.

Thanks for coming by,
I'd love to hear your thoughts in the comments.
Til next time,
stay arty,


Wednesday, 4 April 2018

Gift Tags with the Minc

Hello crafty friends and welcome to the blog today!

I have something a little different to share with you but it's something quick and easy and it made a great gift!!


Yep, lots of little tags which I made for my Mum for her birthday, and before you ask, yes, this is what she asked for!! My Mum crochets and has found herself with enough beautiful things to last a life time,
a bit like us with our paper, right?!
So she has decided it's time to sell some off and wanted tags to go on them.
With that in mind off I went!!


I started with the GORGEOUS Minc paper pad - brights (these colours are divine!) and got designing on my computer in Word. I used a very simple design, the font I used is called PN Octopus Socks Script. I had my document printed onto the card through a laser printer so I could Minc away.


I chose the holographic foil - it's "neutral" enough to go with all the colours and oh so pretty, I love it!! Because I have the 6" Minc I had to cut my pages down to fit into the carrier thingy - yep, technical - this meant I had to do multiple runs through the Minc. You will notice in the close ups some of the foiling is not perfect, I think that was the print and not the Minc itself or the foil as I have not had a single other issue with either! I am quite happy with the less than perfect look, I mean, I don't often do neat and perfect in either my scrapping or real life.

I die-cut all of my tags using a metal die from my stash but you could so easily use another tag as a template and hand cut, use a Silhouette, a punch, or simply just freehand some tags or any other shape that appeals to you.


I used a paper punch from my stash paired some of the off-cuts from around the tags and also some vellum to create a very simple embellishment for each tag (you could of course use ANY type of printed vellum as well, that would look great too!). I lightly stuck the layers together and ran them through my sewing machine, a little bit of glue and my final touch was some twine.

Like I said, a pretty simple project but Mum loved it and it was fun to put together something a little different!

There is a process video for this over here on the Scrapping Clearly YT channel - it's not very long - but I hope you enjoy!

Thanks so much for stopping by, until next time, happy scrapping!

Melinda


Tuesday, 3 April 2018

March Challenge Winner

Such fabulous pages for our March challenge!
But
There can only be one winner.

Congratulations Sandra Brimelow!


We loved how Sandra rotated the sketch.

And you can win your own $30 Scrapping Clearly voucher by playing along with our April Challenge!


Happy scrapping!

Monday, 2 April 2018

Magical - 12x12 layout


Hi everyone, 

Hope over this long weekend you managed to get some down time in.
I know I’ve been trying to take time out for some creative play. 
So today I share a 12x12 with you. I’ve been doing a lot of other play with art journals etc because I thought I had become boring in my scrapping. 

But after creating a few new 12x12s I realise I just love this process so much.
Yes, sometimes they can look the same and yes, the process can be the same but it doesn’t matter, it’s about having fun, creating for you, and just really enjoying the art for what it is.
I am my own worst critic. 
So with that, I got inspired by this month's challenge . And I love that we have been combining them. 


I was also inspired by this beautiful art work I found on Pinterest. 


I’m not sure of the original source, but I’m in awe, and had to use it. So gorgeous! 

And here is my creation.....


How awesome to have these moodboard colours to suit this photo. 
I started with a sheet of Paper Arts Artistry2 for my background, then I spread a bit of gesso, then through a stencil used Jo Sonja’s Texture paste black and then added my colours over it. I chose Distress Oxide in Fossilized Amber and Wild Honey
Then I needed to balance the yellows with some blue. So I splashed some mist in aqua, and Liquitex paint marker in cobalt blue which I added water to and flicked around. 


Once dry I stamped a few different images around including the Darkroom Door hexagons and Dina Wakley abstract scribbles
Behind my image I used a sheet from this Heidi Swapp 6x8 paper pad  and  one from the Pink Paislee 6x6 Memorandum pad. 


For embellishments I used a few of the arrows from the Heidi Swapp color resist embellishments pack, and a couple of the stickers from the Marquee Love rhinestones pack. 


I finished my page with some of the cool pebble rocks in aqua  mixed with glossy accents  to adhere to the page. These are awesome!! 

This layout is also the sketch flipped on its side. 

I hope you play around with this months challenge, they are always so much fun. 

I’ll catch you all again soon, 
Till then,

Em xxx


Sunday, 1 April 2018

Ella & Viv Graffiti Papers

Morning everyone,
I hope you have all had an amazing Easter so far.
The weather has been absolutely glorious.

I was lucky enough to receive the awesome Ella & Viv Graffiti papers in my DT pack and found that they just worked so well with the awesome photos of Moon, the band, in the recording studio,
photo credit to Russell Cherry. 

The papers have so many colours in them that will suit almost any photo you have.

To finish my layout I have used Tim Holtz Idea-Ology words.


I love the versatility the Tim Holtz Idea-ology words.


I have also included some Dina Wakely Washi Tape on a couple of the edges and under the photo.


To finish my layout I have inked around the edges.

I hope you have enjoyed my share with you today.
Next time I will be sharing a beautiful floral layout with you all.

Happy Scrapping,

Kim Kendell