Thursday, 27 December 2018

Chic, Timeless, Beautiful - With Karyn Schultz!

Hi Scrapping Clearly Lovelies,

It's Karyn here, and today I have a scrapbook page to share with you made using lots of goodies from the  Scrapping Clearly Store.
I'm also playing along with the December Moodboard Challenge. We would love for you to join the challenge and be in the running to win a Scrapping Clearly voucher - you have until December 31 and you enter by uploading your photo to the album in the facebook group here.
My background is  white cardstock overlaid with some velum from the Pink Paislee Moonstruck collection and some strips of washi from the Heidi Swapp Magnolia Jane Collection. 
Underneath my photo I've used ephemera from the Pink Paislee Moonstruck collection, a Pineapple paperclip from the Heidi Swapp Pineapple Crush collection, and Heidi Swapp puffy stickers. I've also added flair, gold thread and paper flowers from my stash.
Thanks so much for stopping by 
Crafty Hugs xx


Wednesday, 26 December 2018

Farewell 2018

Hello.

 Leonie here with my farewell post for 2018 and also my farewell to the Scrapping 
Clearly Design Team.
I've been on Kylie's wonderful team for about 15months now and enjoyed using the lovely products Kylie has in her shop to help inspire our readers here.
Thanks for reading along with my posts and thank you Kylie 
for offering me a spot on your awesome team. 
xx

My last page for the team uses my favourite paints Dina Wakley Media Heavy Body acrylic in Gilt colour. I watered it down and smooshed it over the cardstock with plastic packaging. 


I then used Modelling paste through a Kinder Kreations Chandelier Stencil. Once dry I went over the stencil again with a black ink pad so that the texture popped a little more off the page.
Under my photos I added some black thread for more texture.


I used the Hawthorne Ephemera pack by Heidi Swapp to embellish this page.  These ephemera packs are designed to be left as they are or they can be run through a Minc to add foil effects.
I left them plain as I already had gold on the back ground with the Gilt paint.


Thanks so much and farewell
Happy Crafting!
Cheers,
Leonie Neal-Dawson


Monday, 24 December 2018

Goodbye and Thanks

Happy Christmas Eve! I hope your are all ready for celebrating Christmas and whatever that entails for you and your families. I think I am as ready as I will ever be with some fresh prawns (of course!) on my to do list today as well as a few last minute groceries.

Today is my final share for 2018 as well as my final share with Scrapping Clearly so I thought I would look back and share some of my favourite creations with you. I have to say I had great difficulty in narrowing it down, as I looked through all that I have created over the year I realised how many special projects that I have made while showcasing the awesome products that Kylie keeps in store.

So, here goes:

I started the year with a Christmas page and thought it fitting to remember it now:


I do love to try and use collections and products in ways not expected! And creating a Christmas page with non-Christmas papers and embellishments was great fun!

Next on my list was this page with lots of Maggie Holmes goodness! I loved working with so many of Maggie Holmes collections and this page was a great mix of three different ones.


Seeing how well all these collections came together shows how versatile they are!

This next page is still using these wonderful collections and shows how you can use lots of different patterned papers on one page and also use them for a boy page.


Who would have thought there would be such a rainbow mix of colours in these collections?!

This next one is a favourite because I loved how the background came together. You know sometimes when you just start doing and you are not sure where you are going with something and it just somehow turns out perfectly? Yeah, well that!


And lastly, another page with a background that somehow came together perfectly was this one that I created using a small gelli plate like a stamp, and then the building up of layers before finally turning it into a completed page.


Let me tell you it was hard to narrow down to these five, I could have easily said that everything that I created over the past 12 months was my favourite. One thing I did notice was my love of colourful and fun pages seemed to be there in every creation, and I do have some favourite products and techniques - namely distress oxide inks and creating layers, especially with handmade tags!

I have linked to the original blog post for each layout if you are interested in having a look at how they came together.

But for me, I would like to say thank you so very much to the wonderful Kylie for having me as part of this awesome team and to all the girls I have shared this space with, you all rock!

I hope to still be around, maybe do a challenge when I have the chance, but life is pretty busy now with a new job and the commitment that comes with that. I am sure one day I will have the balance right! 

I wish you all a very Merry Christmas and Safe and Joyous New Year.

Katie xxx


Sunday, 23 December 2018

Moodboard Inspiration

Hello Lovelies

I have done a mixed media layout inspired by our December moodboard


I started with a 12x12 sheet of chipboard which I sprayed with gesso from a can (not cheap and not easy to find)

I took a template and sprayed lightly with Art Anthology Glorious.
Because of the gesso spray it will bead and does take a bit of time to dry, so let it dry and go do something else.

I then took a black acrylic paint and watered it down a little in a spray bottle and applied across the page. While this was still wet I did the same with a gold metallique acrylic paint and added it in a few spots across the black and then let it drip down.

Once this layer was dry I took a different template and clear embossing dauber applied through the template lifted off and then sprinkled on a antique gold thick embossing powder and heat set.

I collected some of my metal accents and a old watch I had taken apart to accent the photo.


I hope the moodboard inspires you too, looking forward to seeing your creations.

Merry Christmas to all.
Tracey

Friday, 21 December 2018

Be you. Be Strong.

Hi all! I am here with my last post for the year 2018!
What a year! Another year of ups and downs, growth, good times... and challenging times. 

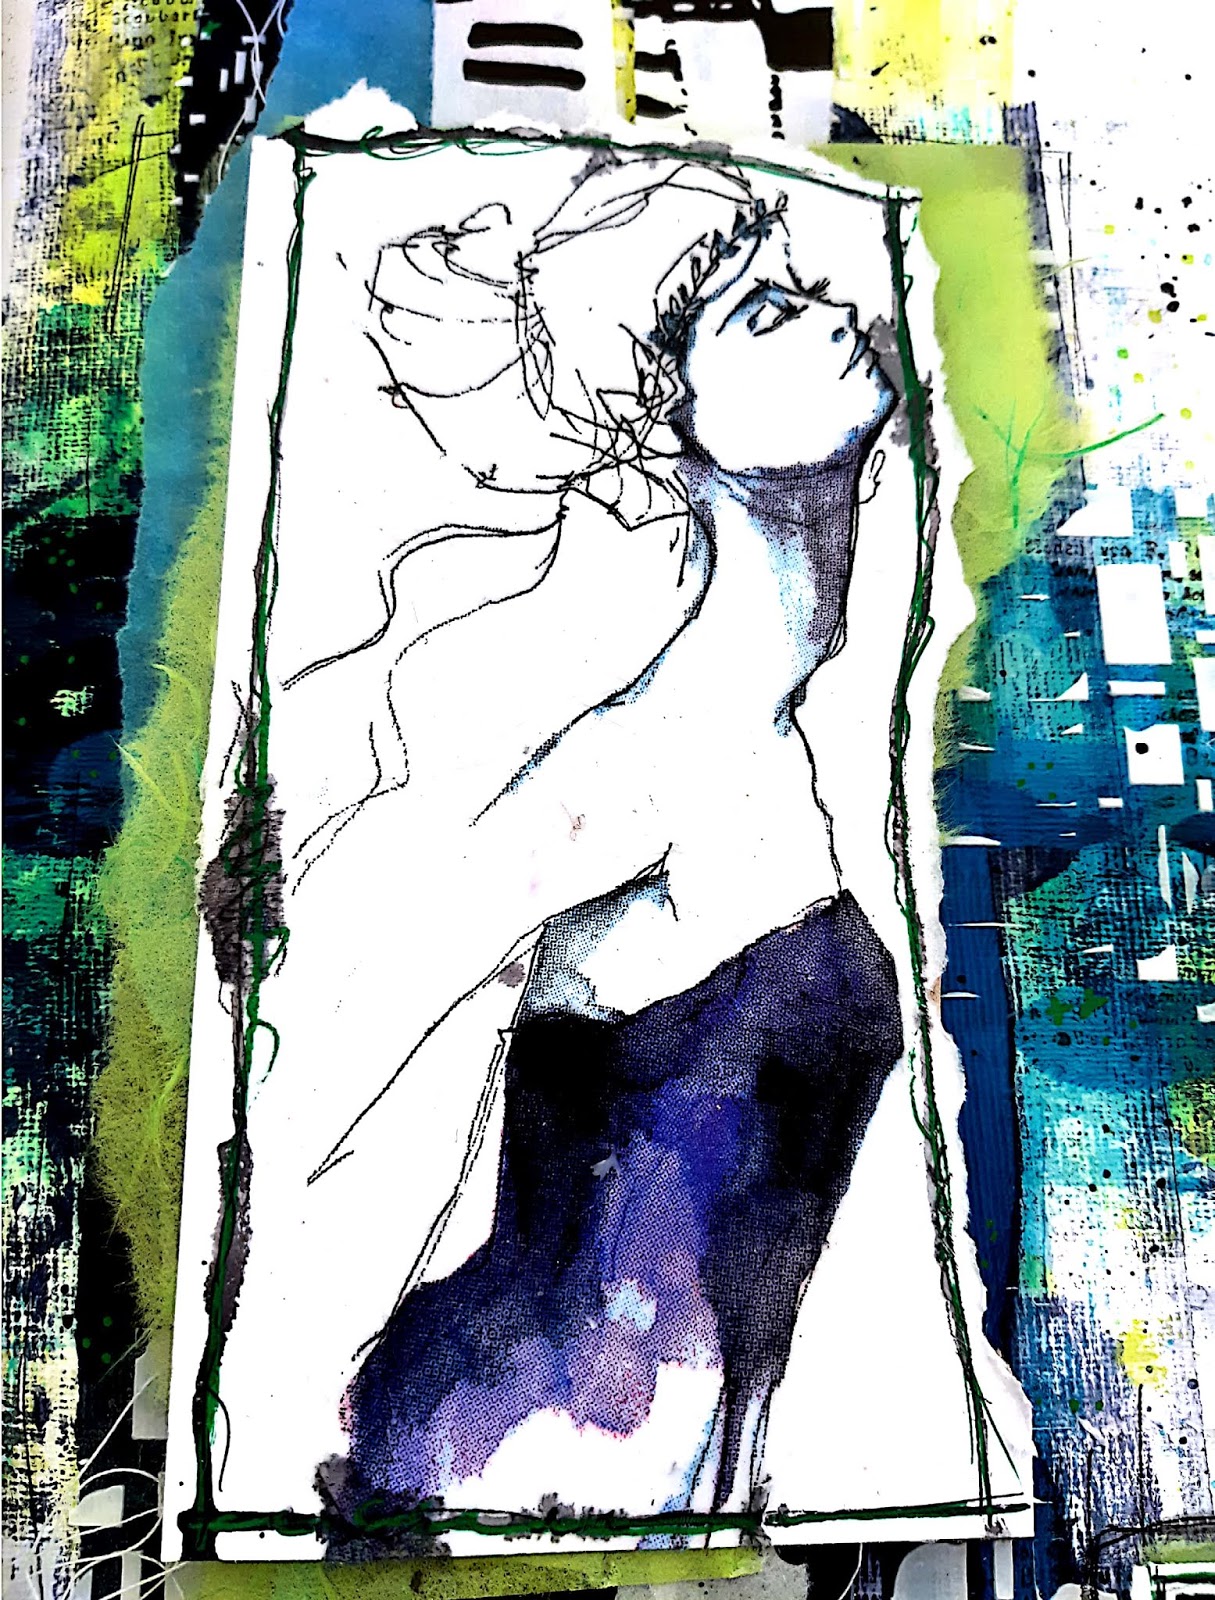
I have here an Art Journal page, which I thought would be a fitting way to summarise my personal journey.


I have used the Dina Wakley Media Journal 8" x 10". For this particular project, I elected to use the watercolour paper in this media journal.


To prepare the background, I used a small Ranger Gel Press Brayer to apply the paint. This is one of my favourite go-to tools. From the store, I used the following paints: Dina Wakley Media - Heavy Body Acrylic paint in Lime, Turquoise, Sky, and Night. 

Once dried, I randomly stamped over the coloured areas with a permanent Stazon Ink in 'Jet Black' and a Prima Finnabair - Vintage Vanity Collection stamp.

Next, to add texture to the painted areas, I applied white modelling paste over Crafter's Workshop 6x6 Doodling Template - Mini Cubist.


The image was selected from Jane Davenport Napkin Collage Paper and carefully adhered it white cardstock with gel medium from my stash. For the border, I used a Posca pen in both 'Green' and 'Black'.

I have mounted the image on top of strips of tissue paper and collage paper. I tore lengthy strips of Dina Wakley Media Collage Tissue Paper then adhered this onto the page over cotton thread from my stash. 


Finally, used Dina Wakley Media Collage Words for the title.


Once, complete, I splattered Colour Blast Colour Spray in 'Roadbase' randomly around the page. 

It was rewarding to create this page. 

I hope you all have a very happy Christmas with your friends and families.

See you next year! ... over here, on the Scrapping Clearly blog!

Amy xx

Wednesday, 19 December 2018

Christmas Table Centerpiece

Welcome to the frantic rush of Christmas Joy. I love this time of year where I get to create that extra little bit of love and joy for the Christmas table. This year I've decided to use an idea I worked with a few years back - the good old Christmas Tree. Now these are not just any ordinary trees... I will be filling this one full of  full of mints for after Christmas Dinner. 


So lets get started...


 I used a small terracotta pot 5" in diameter and a foam cone 8"tall &  a piece of dowel 9"long . They were glued together with a hot glue gun. I then painted the pot with some red paint and the dowel with gold paint.    To make the leaves for the tree I chose a funky piece of 12x12 from the Escape the Ordinary PinkFresh range called Chase - It's a dark olive green so worked in perfectly with the Christmas theme. I cut the strips into long half inch strips and then cut them off at 2" intervals. 


Once all strips were cut I used my scissors to create a fringed end - I cheated as I have multicut scissors to cut half way up the strips. I then bent the paper and curled the ends with my fingers. Start gluing the leaves on. Firstly I ran a row of tape around and then used glue on each strip as I adhered it to the cone. 


Work your way all the way to the top. I cut the top leaves slightly thinner so they would fit around the cone tip nicely. You may have to hold these in place a minute so they don't pop off.
Time for a little decorating. I used Faber Castell Glass Bead Glitter Gel and draped it over the top of the tree. I also made small drops fall onto the leaves to give it a snow like appearance. 


To make a few decorations around the pot I adhered some large gold sparkle scallop tape  to the top of the pot and I ran the silver Heidi Swapp Decorative Washi tape around the top.


 I stamped a few pine leaves from the Inkadinkado branches range and stuck them either side of the 25. These are seriously cool numbers from the Heidi Swapp Make Pretty Stuff  embellishment range and come in a pack of 21 pieces. 


The other gold leaves are designed by me and cut with my silhouette and coloured with the Artline Gold pen. I glued these on with Xpress it glue. 


The final touch was the wooden star coloured again with the Artline gold pen and glued to the top of the tree... now it is ready for filling full of mints for the dinner table Christmas Day. 

I hope you have enjoyed this quick little project. It is only 6 more sleeps till Christmas & still plenty of time for you to be inspired to create something special at your Christmas Dinner table this year. 

Have fun creating
Tracey

Tuesday, 18 December 2018

Make A Wish - With Karyn Schultz!

Hi Scrapping Clearly Lovelies,

It's Karyn here, and today I have a scrapbook page to share with you made using lots of goodies from the Fancy Pants "Golden Days" collection available in the Scrapping Clearly Store.
I'm also playing along with the December Moodboard Challenge. We would love for you to join the challenge and be in the running to win a Scrapping Clearly voucher - you have until December 31 and you enter by uploading your photo to the album in the facebook group here.
My background is the Forever with you paper from the Golden Days collection. I've matted my photo with more of these papers and a feature of my page is a gorgeous cutfile from Paige Evans . I've then added ephemera and word stickers from the Golden Days collection and paper flowers from my stash.

Thanks so much for stopping by 
Crafty Hugs xx

Karyn