Showing posts with label colour shimmer dust. Show all posts

Tuesday, 14 May 2019

Shine

Hi everyone.   
I'm super excited to have been invited to join this very talented DT.   So here is my 1st LO inspired by this month's gorgeous mood board.


I started with some old My Minds Eye patterned paper.   I masked off a portion of a Dina Wakley Jungle stencil with some washi tape and scrapped some modelling paste through with a palette knife.   I then cleaned the stencil, flipped it over and repeated the process.   This is a great way of making more use of your stencils.


I did some random stamping using a 49 & Market stamp with some Fossilized Amber Distress ink and some navy water based ink.   I sprinkled on some Colour Blast shimmer dust in navy and gave it a light spritz with water.


I grabbed a few wood veneer leaves from my stash and rubbed them (using my finger) with Indian gold Nuvo embellishment mousse.   I then added a touch of Viva Inka Gold in Haematite on the leaves and on the modelling paste so it would stand out.

I sprayed some cheese cloth with some Tattered Angels Glimmer Mist and then stuck it all down with a little bit of gold thread thrown in for good measure.

I finished by adding my title, a gorgeous Heidi Swapp acetate word and a scattering of Finnabair Art Ingredients Mica Flakes stuck on using gel medium.


Thanks for stopping by.   
Enjoy your week and hope you have some time to get crafty.


Saturday, 27 January 2018

Take a Deep Breath- a Scrapbook Layout with Em.


Happy Weekend ScrappingClearly Peeps.

Hope you have been keeping cool if you're in Aussie land, and if you are in a land with snow and cool air
I hope your marshmallows are toastie.

Today I'm playing with an image that I got off Pinterest.
I have 2 boys who don't like having photos taken as often any more (I sneak some though),
which makes me source images from other places, Pinterest being one of them.
I find this also allows a different type of creativity on my pages.
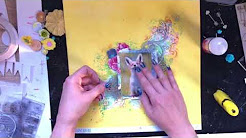
This cute little fox looks so calm and at peace, it made me think of spring and a time of wonder.
I don't get to use flowers much so a pic like this allows me to be a little floral.

I started by choosing a couple of 6x6 pages from the Heidi Swapp September Skies pad.
And I also fussy cut out a section of flowers from one of the sheets, that I tucked up under the top left corner.


For the page base I started with good 'ole Gesso and Texture paste,
and then started playing with a couple of
Then a layer of Distress Oxide in Fossilized Amber.


Instead of using black to stamp, this time I used the Distress Oxides.
I used a couple of Kaiser stamps and also the flowers from the Prima Cling stamp.


I coated the Dusty Attic Chipboard arrows in Peacock Feathers Oxide ink.


Then finished off my layout with Liquitex Artist Ink Titanium white.


I have also made a video for this page.
I hope you enjoy it, I had fun creating it.
My eldest Son Jude has been creating music for my layouts which I love
as he gets a buzz out of this form of music creativity.

So even though I may not always have a photo of my boys they are always supporting me in some form of my art.


I'll catch you all again real soon.

Have a great weekend.


Wednesday, 29 November 2017

Art Journal Page - with Emma

Hi again everyone.

Today on the ScrappingClearly blog I tried something new. I played in my art journal.
So many other scrappers inspire me so much, 
and I don’t normally do this form of media.
I have tried it a couple of times but always think it looks silly.
However, I decided I needed to embrace and create! And I love trying new things. 
I kept it simple, only using a couple of colours. 


I didn’t want to overwhelm myself with colour. 
I started with Tim Holtz mini collage crazed medium on the base,
as a prep on my page before I added colour, and layered a stencil. 


I then started stamping, feeling free to let the page kinda create itself.
I used a black pen and highlighted parts of the stencil. 


I then thought I needed a title,
so, using an OnTrend2 journal card I cut out the quote to make one. 


I loved the Gold in it.
Then I found a quote that reflected the creative vibe I was feeling. 


A few Liquitex artist inks flicked over the page and it was finished. 
I’m pretty happy with it and look forward to playing like this more in the future. 

Have you tried this form of media yet? 
I'd love to see, share in our Facebook group, or even try as one of our monthly challenges.

It’s very freeing, I highly recommend it. 

Catch you all next time. 
Em xx

Monday, 17 July 2017

Dream with Melinda Sweetman

Hi there my scrappy friends and welcome to the ScrappingClearly blog this lovely Monday! Melinda here with you today sharing a page I created using (once again!) the very awesome Starshine collection by Shimelle! I just can't help myself, I love it!!

Here is my page


I was VERY inspired by a page shared on You Tube by Lillith Eeckels and had a bunch of stars I had created that I wanted to use up and went with this design! Isn't it fun!

I started by stitching that black circle onto my background after drawing (about in the middle) a circle using an empty paint pallet of the page as a template. I went around about 6-7 times and I LOVE the texture it gives!!

I created my stars by first cutting a half or 3/4 of a full 12x12 piece of white card on my cameo. Next a quick coat of gesso, some stamping with black permanent ink and then COLOUR! I have used some Colour Shimmer Dusts by Colour Blast - these little pots are AMAZING to play with. I have used Candy and I think Cobalt but it may have been Peacock.....


When I stuck them down I just used a little dot of wet adhesive in the middle of each star and love the dimension I have achieved!

I used a couple of layers of papers (namely the Gemini and Hubble) behind my photo and then I have used the Chipboard, Flair, Thickers, Paper Clips and Rub-On pens to embellish. Oh and the background paper is Juno!


I have used one of the clear stickers for the title (I stuck that to some white smooth cardstock and fussy cut) and also a few acetate pieces from the ephemera pack!


Lastly the journalling, the date and some splatters, again using the Colour Shimmer Dusts and a paint brush! Oh, and a hint of the Midnight Colour Shimmer Dust to balance out the black of the stitching, the stamping and also my journalling!

If you would like to see my whole process the YouTube process video is linked below! Make sure to subscribe to the channel so you can keep up with all of the new shares over there!


Until next time, happy scrapping!!


Melinda

Thursday, 8 June 2017

Sand Angels with Melinda

Hello there ScrappingClearly fans, Melinda here with you today sharing my take on the very awesome June 2017 sketch challenge.

A quick refresher


And here is my interpretation


I've stayed pretty true to the sketch this month, I really loved it! 

Before I did anything I applied a really thin, quick coat of white gesso in the title area and the main photo cluster area on this Cocoa Vanilla Studio, Free Spirit, "Word Jumble" background paper.

After that dried I worked on my title. Whenever I hand stitch I like to work first on the stitching. If your interested, the font is called Magle Script and I got it free from Dafont.com . I have used some ombre embroidery floss from my stash and really love all those shades of blue and that scripty font paired with that beautiful minty green/teal-y acetate alpha by Heidi Swapp.


Of course some mixed media in the background and today I have used the smooshing technique and some of the beautiful Tim Holtz Distress Oxide ink in Faded Jeans to start with. I applied a couple of coats and made sure to dry thoroughly between applications so to get the beautiful layered effect these inks are fabulous for!


I wanted some variation in the blue so I also grabbed some of my Colour Shimmer Dust by Colour Blast in Navy and again did the smooshing technique. After that was dried I added splatters using both products and 2 different paintbrushes.

My next layer was some more tone on tone - this time the Distress Oxide ink with this stamp by Darkroom Door. After inking the stamp I applied a really quick light spritz of water and love how the ink changes!


I also wanted to bring in some of the minty green colour from the title so I grabbed my Cracked Pistachio Distress Oxide ink and this Heidi Swapp stamp in the Magnolia Jane collection and applied a few different words and LOVE how this turned out and LOVE, LOVE, LOVE how the colours don't mix together but instead sit on top of one another.

I decided that I wanted that darker blue colour all around the page so pulled that darker blue skyline paper from the Shimelle Star Shine 12x12 paper pad and gutted it. I added couple of paper layers behind my photo using this paper by Cocoa Vanilla Studios and part of the paper in the background.


I added a few ephemera pieces from the Shimelle Star Shine collection, a couple of the gorgeous clear acrylic clouds, my journalling and of course the date stamp.


I did make a process video for this one and you can see that below, just click the big play button ;)


As you can see I have used a bunch of different suppliers and ranges to create this page and I love how it came together in the end!

You have the whole month of June to play along so please load up your challenge to the correct album in the ScrappingClearly FB group for your chance to win a store voucher!!

Until next time, happy scrapping!!


Melinda

Thursday, 6 April 2017

The Best Things with Melinda Sweetman

Hi scrappy friends, Melinda here with you today sharing my take on the fun April sketch challenge, once again designed by the very talented Peg!

Here it is if you haven't seen it yet


And here is my take on it


And you can watch my process on the link below - just press the play button!


I have used the Kaiser Craft Ooh La La collection pack for this and mostly just the Oui Oiu floral paper (I fussy cut the florals from it) and the Belle paper.


I have a little of the packaging technique in the background with the Avocado Art Anthology spray and applied a few splatters in Navy Colour Shimmer Dust.


The finishing touches were a few of my left over triangles from my last project - as photo corners and also as corners on the top left and bottom right of the page.


So, make sure you get your entries in for this months challenges, you still have most of the month to get them done! Head over here to the FB group to upload your entries. We love to see the way you guys interpret the challenges!!

Thanks, as always for stopping by and until next time, happy scrapping!


Melinda

Products used (and still in stock!)