Thursday, 10 March 2022

'Embrace the Gloriousness that you are' by Emma Zappone

Hello there.
Em with you today, and firstly let me just say how much I adore this months mood colours!
They are so dreamy. Here is what it inspired me to create. 


And here is this months mood/sketch....


This week I only played with the mood board. I will save the sketch for later in the month. 
I kinda wanted to keep my project girly with a little grunge. I also wanted to play with some of the Art by Marlene goodies I received.


I used ABM Anemones So-fish-ticated stencil to start the page off. I mixed some Finnabair Mica powder in the pink and the blue powder with some light modelling paste and then spread through this very cool stencil. I wanted to create a cloud like effect with the 2 colours through the stencil background.


Next I added some more texture by rubbing some blue ink through a number stencil.


I added quite a few ABM stamps on to the background also to what would become my 'frame' for the photo and layers.


The layers behind the photo consist of a few torn pieces of an ABM sheet from her Bold & Bright Paper pack and a piece of book paper that I had added some Art Alchemy acrylic blue paint to compliment the background. 
Then I added some embellishments.


Now lets talk about this resin horse. I really wanted to continue the girly theme by adding something sweet. This prima merry-go-round horse was the perfect accessory. And I added a few layers of paint, rather thickly to create an old feel about it, slightly rustic, something of the past, a weathered look. Once the paint was dry I rubbed Finnabair Indian pink wax over the top. I love how it looks.

Once all my elements were in place, I flicked some Kitsch flamingo over the whole page along with some white acrylic also. And I added an ABM sticker quote.


I do hope this page inspires you to create this month. I look forward to seeing all the entries come in.
Have a great day and I will see you all soon.

Em xx


Wednesday, 9 March 2022

Beautiful but crazy, by Amanda Hartmann

Hi SC fans!

Created my own background for this layout of my beautiful by slightly crazy family...

For the background I used:
* script 12x12 stencil from my stash
* large chipboard circle from my stash


Here is the full page.//....

I started by stenciling with the Art Alchemy Metallique Paint in Vintage Rose through my old script stencil. I made sure to only stencil in a circle in the centre of the page. I used a credit card to make some swipes in the paint.

I found the big chipboard circle, and after giving it a coat of white gesso, I painted it with Dina Wakley Gloss Sprays in Ruby. I took the lid off the spray bottle and used it to paint with a paintbrush. So bright and shiny.

I layered some of the Dina Wakley Collage Papers with washi tape to create a few points of interest.

Finished with some Gloss spray splatters (Ruby and cheddar), the title and some stickers and bits and pieces!


Thanks for looking today!
Amanda


Saturday, 5 March 2022

Chook Apron created by Tracey Thorne

Welcome to another Saturday and I am all fresh and light with this new March Moodsketch. 

Seriously the colours remind me of fairy floss - absolutely delicious. 

So here is the moodsketch 


I've tweaked the sketch part a little so suit my photo sizes... but I've started on a base of white cardstock and to that I have added some Art Alchemy Sparks acrylic paint - Magical Pond. I used a wet brush and watered it down before painting it in three sections on the page. I have then used a TCW stencil and made up a little Vicki Boutin paint - candyfloss with some Liquitex modelling paste. I added this over the shimmery blue. 


I was loving the shimmer but the blue wasn't quite right so I pulled out the Vicki Boutin watercolour crayons & chose a vibrant blue and then added this with a thick flat brush. I dabbed the head of the brush with a large amount of colour over the shimmer paint.


I stamped the AALL & Create stamp #396 Sewing Forever onto some tissue and added this as my next layer after finding placement of phots. I have layered the photo on the left with a little cardboard to help it lift of slightly off the page. I used the AALL & Create stamp #392 to help join the tissue paper elements to the page.


Adding the embellishments - I have then added a little torn Cocoa Vanilla -Love Always- Class Act printed paper around the outer edges of the photos. I have used some Crate - Maggie Holmes sticky notes layered at the top and the bottom of the page. Cocoa Vanilla -  Endless Summer puffy stickers were added in various spots to enhance the pink/peach theme of the moodboard. Finally a few floral elements from the Cocoa Vanilla -Love Always ephemera pack were added. I have used a darker shade of pink for the title using American Crafts fabric Thickers.


I finished off the layout by adding a few dots using a Viva LasVegas and Ranger Ink in black. A little pink cotton around the corners also helped soften the layout.


Thanks for popping by - have fun creating with this months' MoodSketch


Wednesday, 2 March 2022

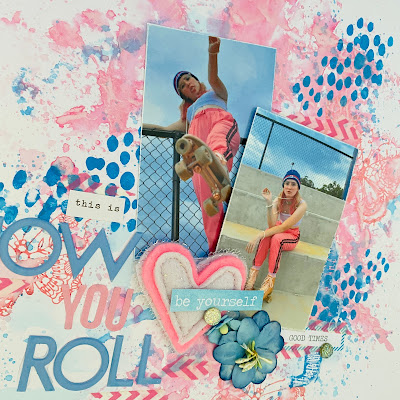
This is how you roll, by Amanda H

Hi SC fans!

And welcome to March and a whole new challenge!

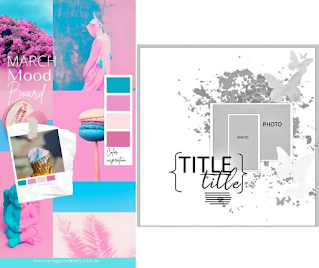
You have a sketch for inspiration, plus awesome colours: pinks and blues...

Here is a sneak of my page.....


Inspired by this moodsketch.....


And here is my page!


I used 3 main things to create my own background - colour smooshing, stenciling and stamping!

Here are the products I used: 
* Tim Holtz Distress Oxide Reinker  - in Kitsch Flamingo
Tim Holtz Distress Oxides Ink Pads - in Salty Ocean and Worn Lipstick

Here are some photos of my background being created.

First I added pink to the background - I used a Distress Oxides reinker (Kitsch Flamingo) - This gave me thick coverage as I smooshed the colour to the page with some plastic packaging.

Next I added some stenciling. I used Distress Oxide ink pad (Salty Ocean) and a blending brush through a Dina Wakley stencil (I used the dots design).

I also used the blending brush to add blue to the outer edges of the page.

I also added some stamping. I used Distress Oxide ink pad (Worn Lipstick) and some old Art by Marlene butterfly stamps. Luckily Kylie has in many of her new release stamps including: Art By Marlene Bold & Bright Clear Stamps – Embrace Change with awesome butterflies included.

Of course, adding some water to the page let's you blend some edges and add splatters.


Here are some close ups - I finished with stickers, washi tape, a Charms Creations heart, flowers and some Prima art pebbles.


Thanks for looking! 

Join the challenge too - add your pages to our FB group!

Amanda


Tuesday, 1 March 2022

March MoodSketch

Our gorgeous March MoodSketch is upon us can't wait to see what you all create with this inspiration..... don't forget to load your entry to the March Album.


Frayed by Tracey B

 hi everyone, back for more crafting with another glorious Moodsketch.


I was first drawn to the feathers but struggled to identify the picture in the top right (it's someone wearing a unicorn onesie - thanks Del!).   That was enough to get me stated and I chose a photo of me all wired up for a sleep study.


I started by googling feather quotes and found this one which I stamped onto strips of paper and glued to my page.

I then went nuts and collaged on a serviette and some tissue paper including some Dina Wakley collage paper which reminded me of a feather.   It didn't matter to me that I covered the quote - I know it's there.

I then sponged on some Dina Wakley paint (Lapis, Sky, Night & Magenta) through some stencils and basically got into a hot mess so gesso, more sponging, modelling paste, more gesso etc.  

Nope, still a hot mess so onto Plan B.

My would-be background became diecut feathers.   Love these! 


Note: found it much easier to die cut on the wrong side of the paper to stop the paint sticking to the die.  Discovered this after about the 3rd feather :(


 I then chose one of my waste pages as my background.   I'm not sure of all the products but the black is 13@rts texture powder mixed with Dina Wakley paint and scraped through an eye chart stencil.   

I traced around my double sided tape with a blue stabilo and used my water pen to activate it.

I had a couple of metal feathers which I stuck to my messy mat using double sided tape (a tip I picked up from Di Garling), coated with gesso, paint and finished by rubbing on some Indian Pink wax.

I roughly created a circle from wire and stapled it over my photos and sewed on some beads and the feathers to create a dream catcher (as if anyone can sleep wired up like that!)

 Added a bird fussy cut from Vicki Boutin Storyteller paper and Heidi Swapp puffy alphas for my title.


here's the finished product

TFL

cheers

Tracey