Friday, 31 March 2023

Do Small Things with Great Love


 Howdy, hi, how are you.
I did a thing....
I created a scrapbook page and to be totally honest it was a great feeling and actually fun.
and it is a great reminder to break out those products you have had laying around to use one day and make it a today day to use them.
 
Do Small Things with Great Love


so firstly - How cute is this photo??
yep it is an oldie, these photos have been around for about 10 years now when my friend took the pictures of Tarj and Ivy. 
I started off with the piece of 13Arts - What Feather you Want pattern paper from the Alice in Candyland collection. 
 Swiped some black paint on the background (those who know me know that I really enjoy adding black to things). In this case it created a nice solid grounding for the rest of the pieces. I then added some stamping using a heap of Tim Holtz Distress Oxide Inks - Candied Apple, Peacock Feathers, Tea Dye, Pumice Stone, Carved Pumpkin. The stamps I used were all from the Viva LasVegas stamps.  

I then layered up some frames and some ephemera from Cocoa Vanilla Studios, 

I also used some Heidi Swapp Clear Pop Arrow embellishments

I also used some Hambly Screen Print Frames 
one of my favourite things is to use some clear bits and pieces.
the title is from the Tim Holtz Quotations Metallic Stickers.


I also added some Flairs (again these are from a while, I think that they were from Rainbow Sorbet). I also added some puffy geo-tags and arrows, and finally some dots.

I think this shows that you can break out the ephemera that you have been holding onto for that special occasion and mix it with the new. 

thanks for joining and having a look at what I have been up to.
Live with Respect
Leanne
xo 


Tuesday, 28 March 2023

Our story by Tracey B

 Hi everyone


Here's a layout that started with some left over ink.


I added some Reverie Foundations pack tissue paper and fussy cut acetate, some Finnabair Icing Paste (Old Silver) through a 12" TCW Alhambra stencil.   I love this stencil and there is a 6" one available in the store.  


I added some very old Color Blast Paste (Deep Water) through another stencil.

I then added some gorgeous 49 & Market rub ons


I dragged out some long forgotten heart and butterfly punches and used a little scrap of Foundations Pack paper to punch a few.


here's the finished page.


Friday, 24 March 2023

to be different, never change

Hi everyone!!

Here I created a layout on a 13arts paper collection called Alice in Candyland using this months Reverie collection.  I was able to use all the leftover pieces from the Luckyfindings Foundations pack to create my "to be different, never change" layout.  I have also used doodlebug design alphabet soup puffy stickers which are available at SC - links below.


 Here are some close ups for you to enjoy!


Have a great weekend!

Thursday, 23 March 2023

'Art Heals' by Emma Zappone

Hi there, Em with you today.
Today I have an Art Journal page and a video for you to hopefully get inspired.
With my health not being great, I have been watching lots of YouTube and have been inspired by many different creatives. So I have practiced a few techniques, and was inspired to create this page.
It's simple, it uses up stash and it has a little 'Reverie' Foundation paper on it.


This page features mostly Art By Marlene products. The acrylic paints, the stamp used is the - Blooming Good set, and die cut image are all ABM.


Before I invest in any NEW ABM I wanted to feature an image from her past releases, as I still have so many. A simple background always helps get the creative juices flowing too.


With white and Black pens, I doodled and scribbled to compliment the stamping. Finishing the page with some ABM quotes.
The best way to describe my process is to share my video with you.
Check it out here....


I hope I have been able to inspire you just as I have been inspired.


Thanks for joining me today. 
Catch you again soon, stay Crafty.
Em xx


Tuesday, 21 March 2023

Bros by Tracey B


Hi everyone

Here's another simple layout featuring few products but including the Reverie Foundations Pack


I started by cutting the washing tape into strips and sticking it onto the page creating frames.


I then sprinkled on a little Lindy's Stamp Gang Starburst Color Shot (Tibetan Poppy Teal).   


A bit more water and some acetate to spread the colour then a quick blast with my heat gun.

I then added a few embellishments including


TFL
cheers
Tracey


Friday, 17 March 2023

A Village of Reverie

 Hello hello

I here to share a Village of Reverie with you all. 

The inspiration for this village is from the March mood board and the Lucky Findings Foundation Pack - Reverie. 

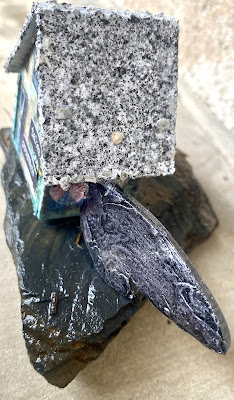
Now my Village is pretty tiny, and it all started with these tiny chipboard houses that I have been hanging onto for years that Jo Kinder created for me. Yep, my houses thing has been happening for a little while now. 


and they turned into this..... 


view from the back. 

so let me give you a quick rundown (quick because I forgot to take photo along the way). I started with the house on the left and then repeated the process along the way. 
The base background was the Reverie Marks Rice Paper. I then filed all the edges to rough them up a bit and added some swipes of Ranger Tim Holtz Distress Oxide - Salvaged Patina (a little spritz of water) and dried all the pieces. I did do a bit of a whoopsie (photo below) and rubbed a little too hard before things were dried. Yep, I am an impatient creator, even with a heat gun. 
For all the roofs, I used the same technique. Painted the bases, covered it with Matte Medium and Lindy's Embossing Powders (each one a different powder) - Groovy Granite, Carefree Verdigris, and Don't Scream Aquamarine. 
For the embellishments I used pieces from 2 different resin packs - Cogs and Wings  and Nocturnal Insects . I covered the individual pieces 2 layers of paint - Pthalo Green and then black. 
For the screws I then rubbed the paint back a little to expose the resin in parts and then added some of the Art Alchemy waxes. The insects, wings, and cog pieces, I did the same base layers but then mixed up the waxes on top so that every house had a slightly different highlight. The waxes I used throughout the pieces are: Art Alchemy Metallique - Aged Brass, Old Silver and then Art Alchemy Opal Magic - Blue Velvet, and Art Alchemy Antique Brilliance - Lucky Emerald. **Note to self - get more of these colours!!!.
I then assembled all of the pieces together and added some Lucky Foundations Design Reinforcements from the Reverie collection and finished with some saying from the Tim Holtz Ideaology Small Talk set.
So, I think that is enough chatter from me. So now I'll let you sit back and enjoy. 


oh and I should add - this little guy stands 9cm tall, is 4 cm across the front, and 2.5cm wide. 

The next little one I wanted a little different. So, this time, I used the Stamp Collection Rice as the background and added the resin Wings coming out the side.


oh and because you can see the back of the wings, I roughly added some texture paste prior to colouring them to give it some added funness (yes, that is a word).
the dimensions of this litttle guy is - 5.5 cm tall, 3.5 cm across the front (plus wings), and 3cm wide.

for the last of the series, I used Design Paper/Rice as the base and featured the insect from the paper on the back of the house to help tie the whole series together. 
back, I love how vibrant the insect became.


The demensions of this last guy are: 6.5cm high, 5cm across the front side, and 3cm wide. 

Please let me know what you think about this little Village. 

oh and also - How do you use your Stamp Collection Rice page out of any of the Lucky Findings Art Foundation Kits.?

Live with Respect
Leanne xo


Thursday, 16 March 2023

'Stay Fearless' by Emma Zappone

 Welcome to another Thursday in March. The weeks are just flying!!
Today I share with you a layout, a 9"x9" layout.
I love playing with different sizes and have been preferring the smaller scale I must say.
I just knew I had to play with this image I found on Pinterest, it's an AI image and it's just so so striking. Plus it went so well with some of the papers in the 'Reverie' Foundations pack. So this layout is based loosely on this months board (colours) and featured pack.


I have used lots of different companies within this project. Starting with Kylie's 'Reverie' pack, I chose the black & white Rice paper and the pattern Rice paper. These I adhered to some firm cardstock to then create a firmer paper layer that I could tear.


Amongst the layers are papers from Stamperia's Amazonia collection and 3Quarter Designs. I added some 49&Market rub-ons to some white card and then fussy cut these out to become my embellishments behind the image.


Castings from the Finnabair Grungy Frames mould are painted with Prima Impasto acrylic in Dark Chocolate and Mint. Finished with some waxes to make them look a little like relics. Which went with this tribal kind of feel the page was taking on.


The background was created by smooshing Distress Oxides in 3 different colours and then with a stencil and a blending tool created these cool patterns to compliment the pattern on the face in the image. I used the new Uncharted Mariner ink for this bold colour. 


It's been so good playing with more papers and elements from my stash with some newer ones thrown in of course. I hope this page inspires you to use your papers in different ways, and to use your stash to compliment newer products also.

I will catch you all again soon, thanks for popping past.

Em xx