Saturday 30 October 2021

Brilliant Bubble Blower created by Tracey Thorne

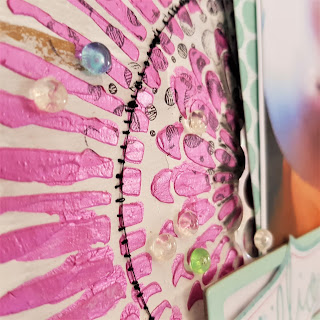
 Welcome to another fabulous Saturday of full blown creation. I do hope you have had an opportunity to create this week. I have moved my sewing machine into a dedicated sewing room space and now I have had to dig out my little travel buddy sewer... she is a little bit in need of a service but stitches the best bobbly stitches because the tension is not right... today I am loving this feature on my page.

Today's page has been inspired a huge bubblegum bubble that my daughter blew. I have pulled the colours from the photo and incorporated circleson the page. To start the page I have used 12x12 Kraft cardstock and to that Gesso was added and rolled out using a brayer. I have heat dried this and then added some Prima Art Alchemy acrylic paint in Metallique Pink Blush through a Studio Light Art by Marlene mask- BM08

The Dylusions stamp - Graphic Backgrounds was used with Ranger Archival black  ink. I have sewn around the stencil in two places with black thread to accentuate the circle pattern of the stencil.


I created a photo stack using Project Life cards and also part of the title was from small project life card. I have stamped out some flowers using Jane Davenport Build-a-Bouquet and have coloured these using  watercolour pencils. The aqua frame is a Heidi Swapp embellishment from my stash.


When placing the photo stack on the page I have decided to add some black thread under this and also a little white iridescent punchinella. The rest of the title was created using Thickers by Amy Tangerine in Memento. I have also added a few little 'raindrops' - these are tiny little plastic spheres from my stash.


Thanks for popping in and having a looksie at my newest page.


Have a fabbo weekend

tracey


Tuesday 26 October 2021

# Home schooling by Tracey B

 Hi everyone

As soon as I saw this photo of my friend's child, my heart went out to her and every parent having to cope with the demands of home schooling in these trying times.   

I am eternally grateful my son is now an adult! (That's my silver lining)

I started by using up a heap of old alphas from my stash.   It doesn't matter to me that I mostly cover these up; it all just adds dimension.


I then added some Art Anthology Velvet (Shamrock) and Gemstones (Amber) through a couple of different stencils.
'Cause I hate wasting product I spritzed the back of the stencils and added that to the layout and the left over to a scrap piece that will no doubt become a background eventually.


I heat embossed some chipboard with some black embossing powder, added some Alpha parts and some epoxy stickers and called it done.


TFL

cheers

Tracey


Saturday 23 October 2021

Shine created by Tracey Thorne

 Welcome to another fabulous Saturday my fellow creatives. Last week on my Facebook Live I touched on creating with older printed papers. I am an avid 'collector' and have quite a few dating back over 10 years ago and today I am going to share a layout using some of those. Most printed papers blend so well with all the new products too which is what I wanted to show you with this 12x12 layout.

I pulled out some Basic Grey printed papers from my stash, these are from a couple of different ranges. I have then punched out some 2inch circles and stitched them onto a base of white cardstock. It is a cool way to use up ends of papers in a range or mix & match to create your own background.


I have then cut two photomats to layer the photos onto. I have not cut my photos down as I liked the white space above and below on the photo. The top photo I built up using some thick card and double sided tape. In creating all the layers to this layout I have chosen chipboard embellishments from Teresa Collins and Cocoa Vanilla- Love Always. 

These Studio Calico geotags are a cute addition to the page too.

I have used a Heidi Swapp Wood word for the title. I have also journalled on my layout by typing ad cutting the journalling into strips before adding to the page.

I hope this has given you a few ideas on how to use up your older papers and newer embellishments.


Have a great weekend

tracey


Friday 22 October 2021

Art Journal Pages by Belinda Spencer

 Hello Scrapping Clearly fans!

Today I have a couple of art journal spreads to share with you featuring lots of Dina Wakley Media products.


I have used the awesome Dina Wakley Media 6x6" Kraft Journal. I love the compact size of this journal and the super heavy weight pages.


I added some collage paper from the Collage Collective book using the DWM Ultra Thick Gel Medium. Once dry I added some stencilling using the brand new Growing Masks and Night Acrylic Paint. I spritzed some DWM Gloss Spray in White and Turquoise over the masks too.


I added a cute little tag cut from the Collage Collective book that I altered with collage and stamping. I added some extra colour to the face using the Jane Davenport Chalk Pastel Set.


I stamped a couple of leaves from the Be Willing Stamp Set using Medieval Gloss Spray on collage paper and added them to the pages.


I added some mark making using a Light Blue Pilot Pintor Paint Pen as well as Posca Paint Pens.


I added the sentiments and a bit more stamping to finish.


My next two pages were created using the same techniques and inspired by the October Mood Board.


Thanks for stopping by the blog today. I hope you find some time to play with your Dina Wakley stash too.

Cheers
Belinda


Wednesday 20 October 2021

Inspirational Quote, by Amanda Hartmann

Hello Scrapping clearly fans!

I have been quietly creating with my Scrapping Clearly stash and I hope to get back to sharing with you all!

Today's page is all about the background... It is easy to create your own unique background with some tissue or wrapping paper of your choice, with some gesso and stenciling layered over top!


I used a roll of the HeidiSwapp MARQUEE LOVE CORK WITH GOLD FLAKES DECORATIVE PAPER ROLL - the paper is light weight and was easy to stick to some white cardstock with some gel medium. It doesn't sit flat or neat, but I liked the grungy look! You could use any light weight paper or tissue paper in your stash and achieve the same effect!

Now add some layers....

Gesso!

then Stenciling: I used some white modeling paste through DinaWakley Media – Stencil and Mask – Done is Better

And lastly some touches of colour with Distress Oxides Ink Pads


The page is finished with some simple stickers [ TIM HOLTZ – IDEA-OLOGY – SMALL TALK STICKERS] and a Charms Creation.


I was even able to glue the same background paper onto the Charms Creation chevron.


Thanks for looking today!

Amanda


Tuesday 19 October 2021

Great Expectations by Tracey B

 Hi everyone

I love blue and green together - there is just something about those colours that make my heart sing.   

I was looking at this months mood board and was inspired to create this.


I started with some Light & Fluffy modelling paste through a Vicki Boutin stencil and then dripped Liquitex Ink - Vivid Lime Green down the page.   I gave it a couple of spritzes of water in places to make it move some more.   


I added some Art Anthology Velvet medium (Aloha) through a TCW stencil (Mini Specimums)
 This paint is my absolute fave; it's luscious, thick to give just enough dimension and comes in a fabulous range of colours.   
I also added some Dylusions ink spray (London Blue & Lemon Zest)


When it came to mounting my photo I decided to use a Heidi Swapp tag but the green stripe wasn't quite the right colour so I used a couple of strips of washi tape over the top.   Happy now :) 


A Heidi Swapp puffy sticker from the Joy Parade collection along with some Heidi Swapp teal alphas and some Jillibean Soup puffy stickers and I was done

TFL
cheers
Tracey