Thursday 30 November 2017

Stash busting Christmas cards!

Hello there Scrappers!
If you are anything like me, you have a rather large stash of older products,
collections that are mostly used but you still have bits and pieces left,
and you can't throw anything away - ever!
Because you never know when it will come in handy!

Well, I decided to make some Christmas cards with what I have on hand.
Preferably not Christmas ranges - there's nothing like challenge, right?!
First up, I saw my sheet of Pebbles – DIY Home Collection – Washi Tape Paper ...
this was perfect for a washi background!


THIS PAPER from the Pebbles DIY Home collection even featured a deer head that I cut out with a paper punch.

For my second card, I used some journal cards from My Mind’s Eye – On Trend 2 Collection – Journal Cards.
Using journal cards is one of my favourite things to do on cards - it makes creating easy!


I added some Heidi Shine on the background for some shimmer
and diecut the deer out of glitter cardstock.
Do you make Christmas cards?
Do you use non-Christmas ranges?
I'd love to see some!
Come over and share your creations in our Facebook Group.

Til next time,
Happy creating :)


Wednesday 29 November 2017

Art Journal Page - with Emma

Hi again everyone.

Today on the ScrappingClearly blog I tried something new. I played in my art journal.
So many other scrappers inspire me so much, 
and I don’t normally do this form of media.
I have tried it a couple of times but always think it looks silly.
However, I decided I needed to embrace and create! And I love trying new things. 
I kept it simple, only using a couple of colours. 


I didn’t want to overwhelm myself with colour. 
I started with Tim Holtz mini collage crazed medium on the base,
as a prep on my page before I added colour, and layered a stencil. 


I then started stamping, feeling free to let the page kinda create itself.
I used a black pen and highlighted parts of the stencil. 


I then thought I needed a title,
so, using an OnTrend2 journal card I cut out the quote to make one. 


I loved the Gold in it.
Then I found a quote that reflected the creative vibe I was feeling. 


A few Liquitex artist inks flicked over the page and it was finished. 
I’m pretty happy with it and look forward to playing like this more in the future. 

Have you tried this form of media yet? 
I'd love to see, share in our Facebook group, or even try as one of our monthly challenges.

It’s very freeing, I highly recommend it. 

Catch you all next time. 
Em xx

Tuesday 28 November 2017

Top 10 ~ Art Journalling with Melinda

Hello fellow blog lovers, Melinda here with you today with an art journal page!

This spread was inspired by the recent 10th Birthday celebrations for ScrappingClearly - once again Happy Birthday!! - and to be specific, Birthday Challenge #1 - List Your 10 Favourite Things.

Here's a little peek at what I created and to be honest with you, when I started
I just grabbed some paint and set off! 


If you'd like to see my whole process just click on the play button below and you can follow along right in your browser otherwise head over to the YouTube channel and subscribe so you are the first to know when one of us uploads a new process video!!


I recently stocked up on some of the GORGEOUS new Dylusions Paints and HAD to bust them out to play! 


For this page I have used Rose Quartz, Peony Blush, Bubblegum Pink and White Linen. I used a combination of a brush/brayer and my fingers to spread the colour around, starting with the lightest and adding more colour
where I felt it needed it.


I added some stencilling with the White Linen and a Tim Holtz stencil. Next I added some stamping using both a grey and black archival ink and a mix of stamps from the 49 & Market "Arrow", "Gabi's Line Stitch" and
Darkroom Door "Arty Circles" stamp sets.


At this point I felt it was too bold so I grabbed my White Linen again and spread it over most of the 2 pages in a really thin layer, so you could still see all the different layers I created, and let that dry.

I hand cut some circles from an old book and stuck them down with some Matte Medium. Then outlined them with a Stabilo Aquarellable Black Pencil and activated with a small paint brush and a little water to blend the harsh black out and the edges of the circles in a little. To tone down some of the book paper I again grabbed my White linen and used my finger to smear some colour over some of the circles - which picked up some of the black and tinted the white grey and I really love what it adds to the page!

I also used the same brush and my pencil to flick black splatters around my page.

I added in some textured details using another 2 Tim Holtz stencils - this time mini layering stencils - using both the Dusty Charcoal Colour Paste by Colour Blast and also the Bling Colour Paste.


I finally came up with an idea - I would write my 10 favourite movies. I typed up the list on my computer and printed it out, adhering the standard printer paper to some white card stock off cuts then outlined all the strips in black ink.

I used these gorgeous Hazel thickers for my title and decided to pop half up the top and half down the bottom, where the extra details were. Love the addition of the gold!

And here is my finished Top 10 Movies Art Journal spread!


I had a lot of fun playing along with the challenges I managed to participate in, and now have 3 more things documented. If you have something new I really recommend pulling it out and having a play, who knows, maybe what you purchased is just the right thing for one of our monthly challenges and you could win a $30 gift voucher just by having fun!

Please head over to the FB group to share your creations and purchases, and also be inspired by, not only the Design Team, but also all of our lovely customers who share away in there!

Until next time, happy scrapping!


Melinda

Monday 27 November 2017

My Travellers Notebook - With Karyn Schultz!

Hi Scrapping Clearly Lovelies!!! 

It's Karyn here and today I have some pages in my Websters Pages Color Crush Travellers Notebook Inserts to share with you made using lots of fun products available in the Scrapping Clearly Store.

I started by cutting out some Polaroids from the Crate Paper Maggie Holmes Gather collection patterned paper and attaching Heidi Swapp ghost alphabet (acetate) alphas to form a title. These were used on the RHS with some photos from our beach holiday.


For the LHS I added some Crate Paper Maggie Holmes Gather collection paper strips and gold acetate then sprayed some of the Heidi Swapp Color Magic Paper Goods ephemera with Heidi Swapp Color Shine Patina and added to the page with a Crate Paper Maggie Holmes Gather collection deer embellishment. 


For the next layout I added some Crate Paper Maggie Holmes Gather collection paper strips to my pages. I added a Teresa Collins Something Wonderful photo overlay over the photo. I sprayed (painted actually) Heidi Swapp Color Shine - teal over the Heidi Swapp Color Magic Paper Goods ephemera. I added some splatters of the Color Shine as well. Lastly I added some journalling. 


I love these beachy colours - and those Crate Paper Maggie Holmes Chasing Dreams collection puffy stickers!! 


Thanks so much for stopping by
Crafty Hugs xx

Sunday 26 November 2017

Go Big or Go Home - Scrapbooking Page

Hello Scrapping Clearly Fans.
This past month I have been creating with the delightful Maggie Holmes Crate Paper Gather and Chasing Dreams collections, you can see what I've created Here and Here.

Today I'm sharing a page with oversized banners.
Yep its go big or go home with this page, large titles and even larger banners. Funnily enough, I was inspired by these sweet little Mini Tassels in the Crate Paper Gather collection and the large script words in the Thicker Accents pack also from the Gather Range. 


Do you use oversized elements on your page?
I'm not one for large titles on my pages or any titles at all really but I was drawn to the large script words in the Thicker Accents pack, and because of their size I thought they should be coupled with something equally large, hence I used the patterned papers from Gather and Chasing Dreams to create 3 large banners and layered them under my photograph.


Thanks so much for stopping by the Scrapping Clearly blog,
Happy Crafting
Leonie Neal-Dawson


Saturday 25 November 2017

Keep It Simple by Lauren Hender

Hello Everyone!!
Welcome back to the Scrapping Clearly blog. 
I'm a little bit excited to share with you my layout today as it isn't my usual style. 

Recently I have had to have a think about my life and where I can maximise time. At first I thought this was an impossible task and feel that I am a really efficient person in general (don't as the hubby! lol)
But I decided to have a think about it and came up with a few ideas. 
In relation to scrapbooking and craft my idea was to make it simple! 
So here it is my first super quick and easy layout... 


One surprise I found was that I got the same amount of joy out of this layout as I did with any of my usual more detailed layouts. 
So my new focus going into 2018 when scrapbooking is don't not do it because you don't have enough time but just keep it simple! 
KEEP IT SIMPLE


This Escape the Ordinary collection by Pink Fresh helped me enormously with this beautiful background piece and sticker accents. I just love it and it is perfect for scrapping our boys. 

Escape the Ordinary can be found HERE in the Scrapping Clearly store. 


The quick and easy part involves these few steps: 
1. Layer your photo
2. Back with tags
3.Add title & stickers
4. Add Journaling
5. Add ink splats
DONE! 

Wahoo! Loving that... lol


What do you think of the We R Memory Keepers hole reinforcer punch?
Found HERE in the Scrapping Clearly store. 

Not only does it create a great effect as an embellishment it is also a wonderful tool to have in planner goodies box. 


Thanks for stopping by. Any questions leave in the comments and I will pop back and answer them. 
Hope you week is wonderful. 

Lauren xo 


Friday 24 November 2017

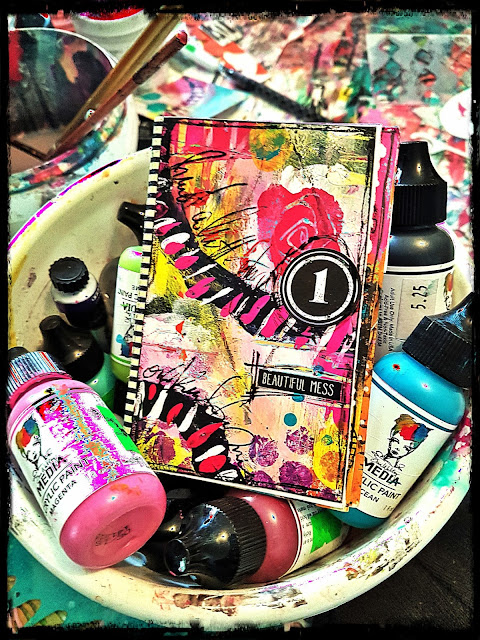
One Beautiful Mess -Creating Handmade Mini Art Journals

Howdy bloggers Lisa here,
back again with a Friday mixed media update.

Today I am sharing with you this cool little handmade Art Journal I created
when I returned home from the annual Gundi Scraptacular.
After giving to others teaching, I had to give back to myself.

Oh the fun of free play, the joyful recharge it gives, creating just for yourself,
these things can not be underestimated.
So atm, we are in the process of redecorating and my creative space is frustratingly limited.
I have also been loving using the smaller of the Ranger Dylusions Journals, a smaller work surface means quicker pieces, and after creating handmade journals in Gundi,
I was keen to bust into making workable smaller handmade journals to create within...


Using a plethora of whatever was across my table 
music sheet papers 
flutterby design stickers


I have put together this little album by grabbing a sheet of cardstock, folding it twice, then cutting and stapling it together. It's marshmallow cardstock and did require a little coaxing into place.
I secured the piece with a thicker, cloth washi tape on the spine as a binding and also through the middle to support the whole journal.


 I start with a simple painty background and
 usually use a stencil to add detail without dimension.


 Then a few different stamped images across the page
 - it's rad when you use a smaller journal and your stamps 
really become cool interest points upon your piece, instead of disappearing into the background.


A little layering of extra card or random cutouts onto your page and details with Posca and other pens usually finish the overall look, and I'm happy to move onto another piece.


 I love creating these little journals so much that I've started another.


Thanks for dropping by the blog, 
I'll be back next week with a little more mixed media creative goodness.
Lisa xxx


Thursday 23 November 2017

Gundagai at Night, and my Sketch Interpretation - FUN

Good Morning Arty Peeps!
Welcome to the Scrapping Clearly blog.

I'm sharing a layout today based on the November Sketch Challenge.


I used patterned paper for my background!
But I added ink because it looked a little boring to me.


I started by using a border punch on this one from the Pink Paislee Fancy Free collection, then cut this one (from the same collection) using a TCW starburst stencil as a guide.
I added extra colour with a splatter brush and Tim's Distress Oxides. A fan brush will also work for this technique.

I applied black Archival ink through a coffee stain stencil with a foam applicator, on the corners like the sketch.


I used an off cut of this paper to mat my pic, sandwiched between bits of black card, then mounted on a Heidi Swapp ghost frame. Some tiny staples add a nice feature to my mat.
That's a Heidi Swapp acetate word too, for my title.
I typed my jornalling on white card and stuck it to a tag coloured with the Distress Oxides.


Another go-to embellishment for me are these cute paper clips, teamed here with a newsprint chippy heart.


Some baker's twine and enamel shapes add some nice detail to my journal tag.

And just to finish off, a couple more photos from our amazing weekend in Gundagai at the beginning of the month.


We took a nighttime jaunt down the deserted main street with my camera on a tripod.


Here with Dad, Dave, Mum, and Mabel, under the full moon.
Jason was such a good sport, Lisa and I laughed so much!

Til next time,
stay arty,